

The Ultimate Guide for Framemeister
Attention: the production of the Framemeister has stopped in summer 2019! Order your unit as soon as possible, since prices will increase very quickly.
This guide uses materials from following sources (including my own observations):
- Review from fudoh
- Wiki page from junkerhq.net.
- Also see this post.
- A lot of useful information is available on this YouTube channel.
- This site offers a perfect introduction into many terms used in this guide
I also recommend to read about interlaced and progressive scan types, deinterlacing and about connection interfaces. You need to know some other terms, like what scaling, line doubling or resolution is.
Overview

The XRGB-mini Framemeister (usually just called Framemeister ot XRGB-mini) is a complex digital upscaler made by a Japanese company named Micomsoft and is targeted specifically for retro gaming. It’s intended to work with different analogue signals (and also digital) and can convert and upscale them to an almost clean digital signal, which is then output via the very common nowadays HDMI interface. The device has multiple options to accept, process and output video and audio signals, but the main focus is on video, of course. It is one of the best solutions for retro consoles, because it can properly process older signals and can improve the image quality.
While there are also a couple of other good alternatives (like OSSC or some very expensive professional video processors), you need to consider, that Framemeister has not only a lot of inputs, but also has functions, other upscalers do not have, like digital zoom, aspect ratio control, manual scaling, resolution upscaling (instead of just line doubling). It will also adapt the frequency (old consoles may use non-compatible frequencies), so that you have the maximal compatibility with modern TVs.
A modern TV Set (LCD or LED) almost always misinterprets signals below 480i and tries to deinterlace and only then upscale them (which is just pointless!), instead of just line doubling them to a higher resolution (e.g. 480p, 720p or higher). For instance, if it recognises the signal at all, it considers 240p signals (output by most retro gaming consoles) as an interlaced signal (e.g. as if it were 480i/576i). It converts the 240p (progressive!) to an interlaced signal, then applies (sometimes very basic) deinterlacing algorithms to convert it into a progressive one and only then upscales it. This results in very bad image quality and the whole process takes a lot of time, meaning the input lag (the time between the button press and actions on the screen) is just too long.
You won’t experience this on old CRT TVs or monitors, which still work with those old formats, so some would just recommend to buy a professional video monitor.
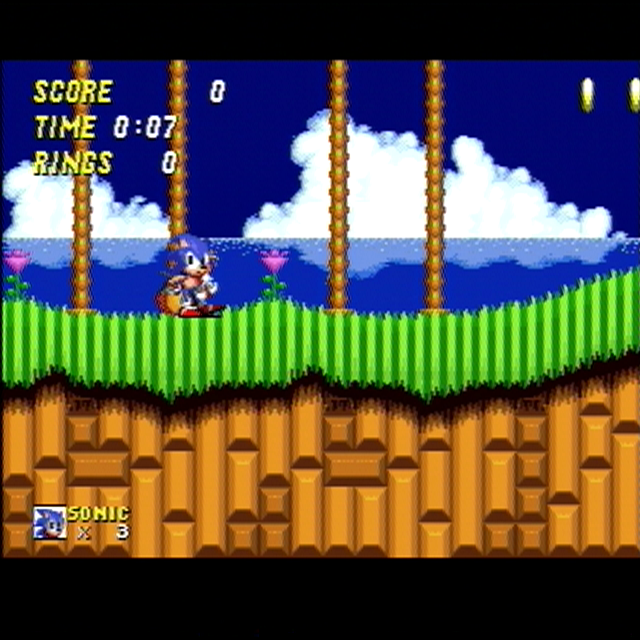
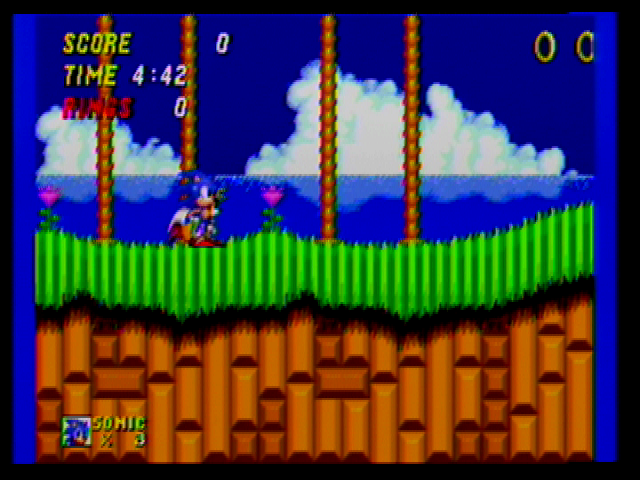
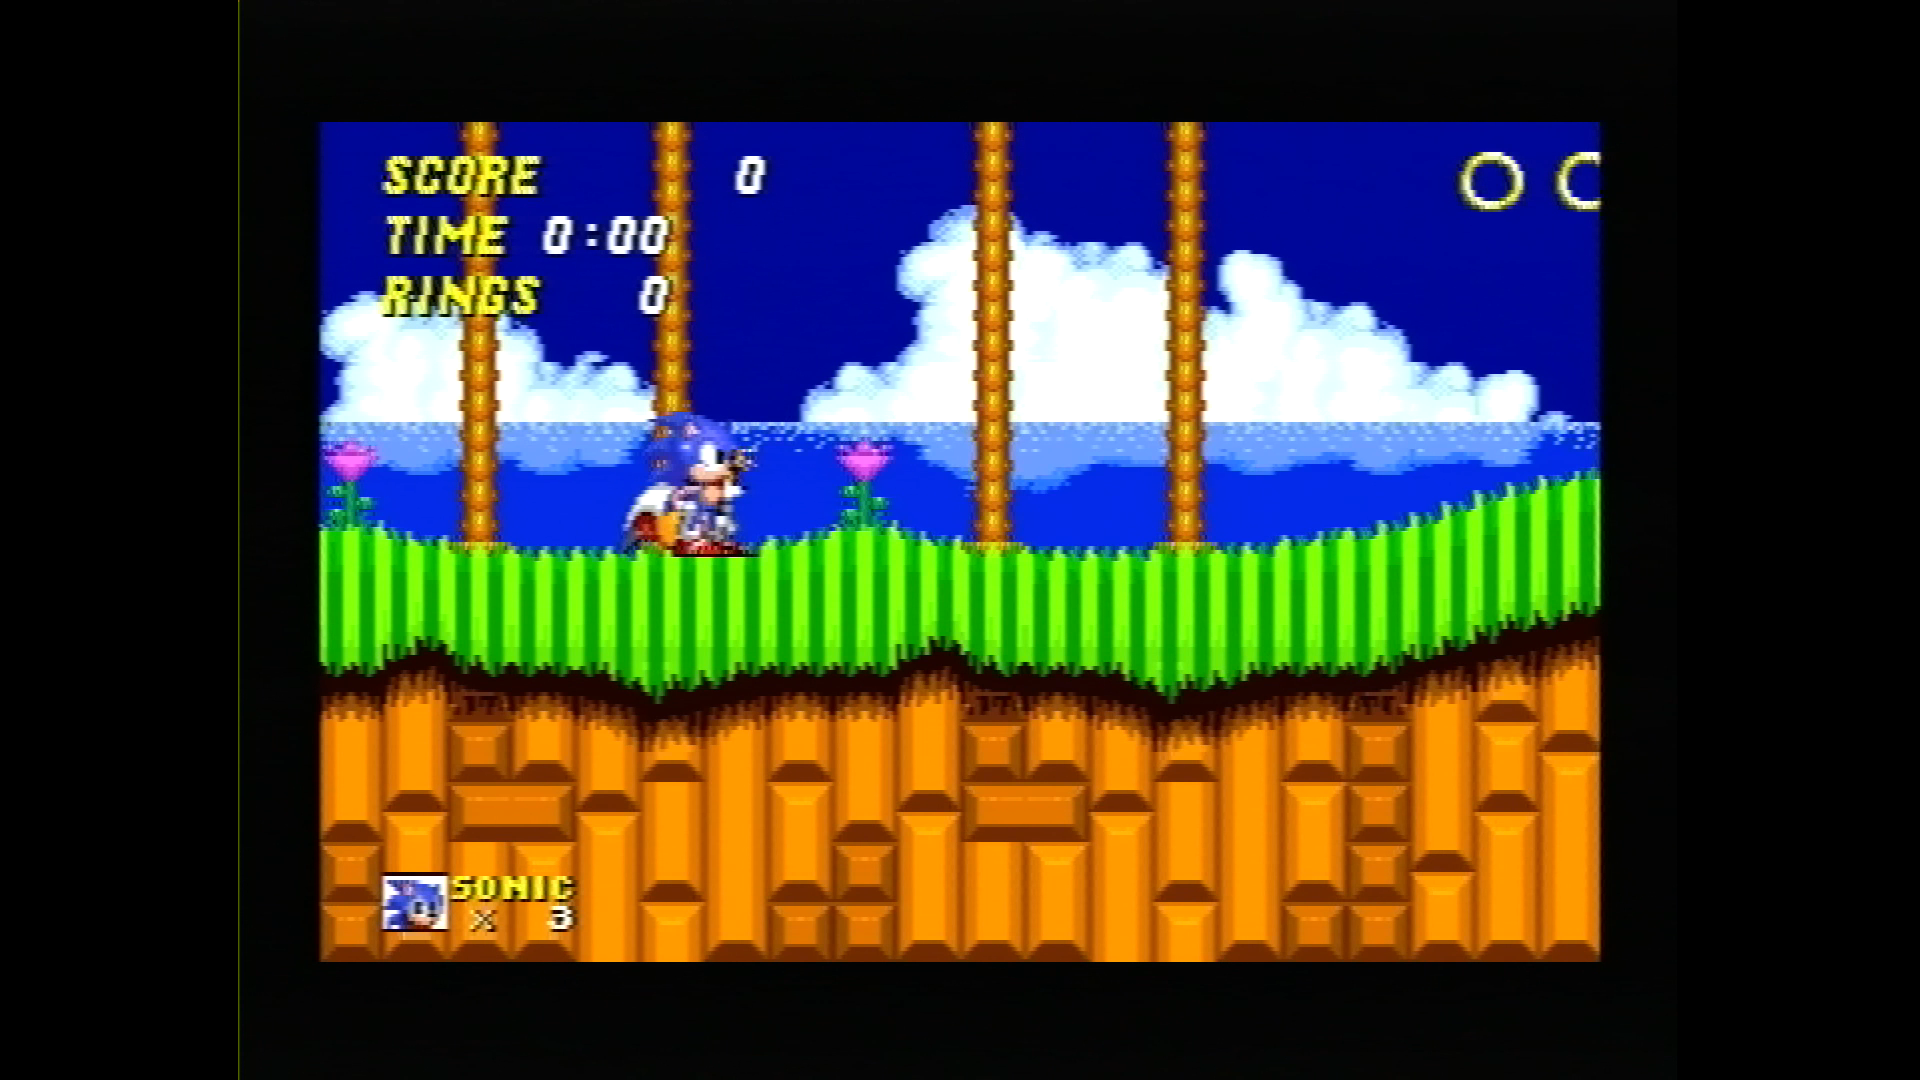
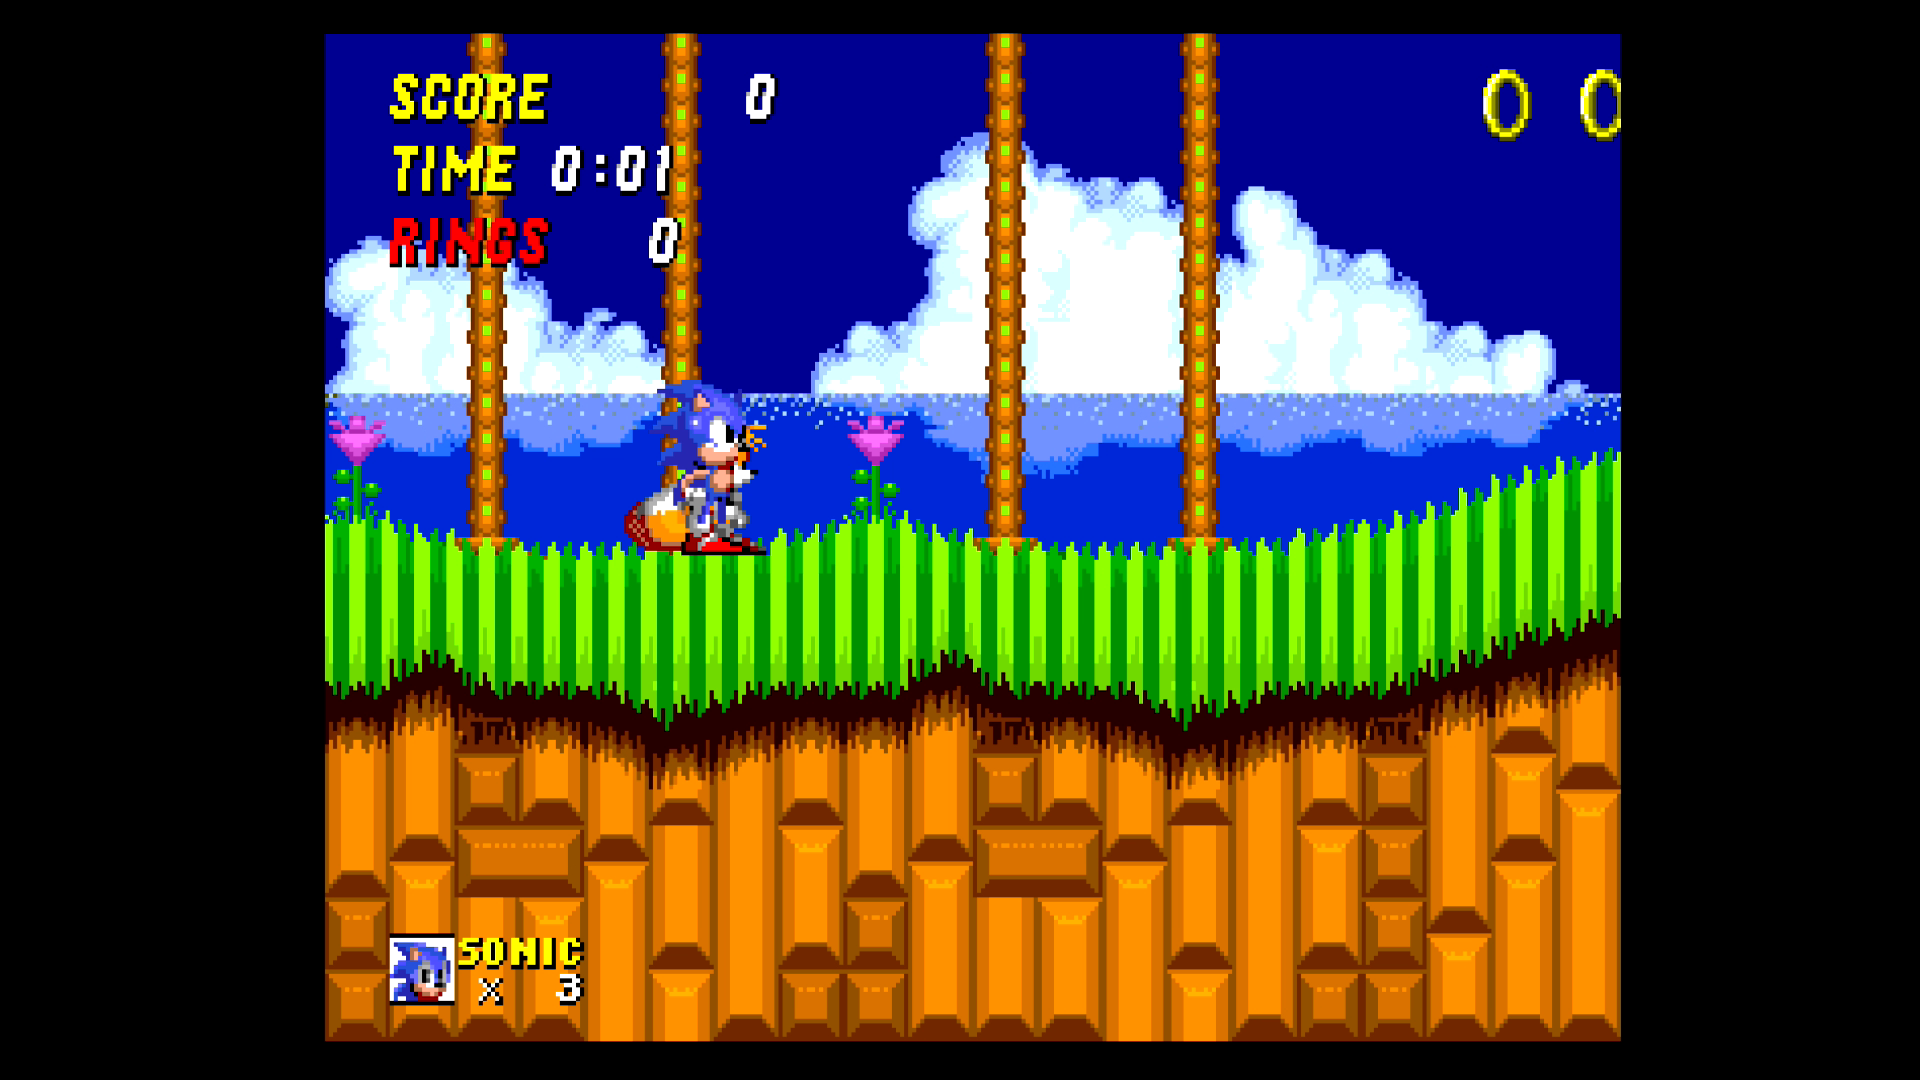
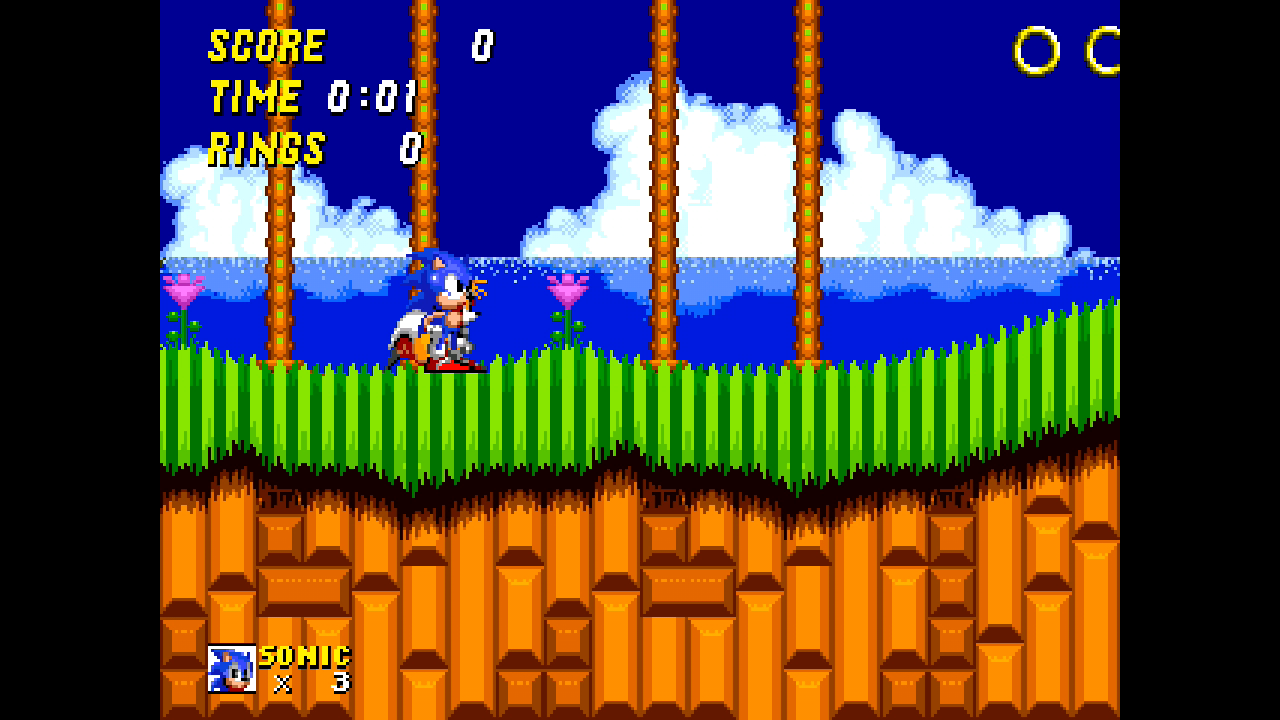
Let’s have an example: Sonic 2 is captured with a Capture Card, which can read 240p correctly.
AV (Composite)
S-Video
Looks nice, but try find that compatible TV nowdays!
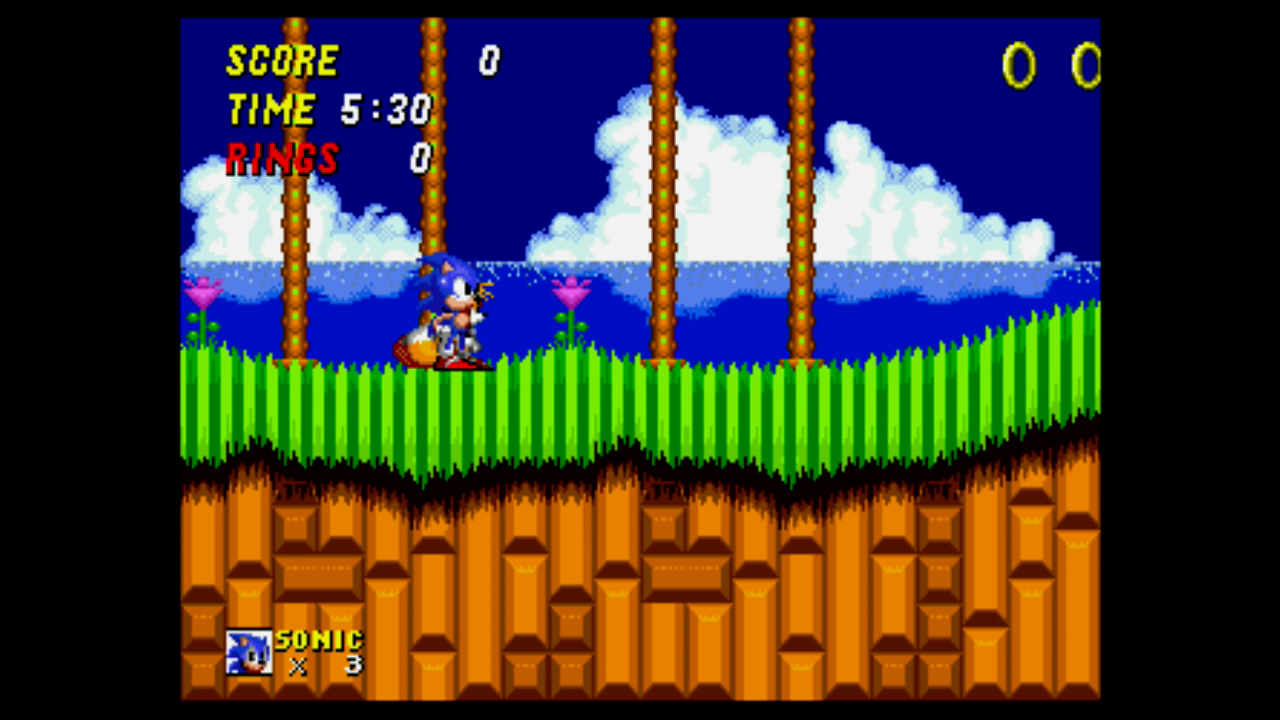
But as soon as we connect this console to a newer LCD/TV monitor… just look at this mess!
AV:
Or even this:
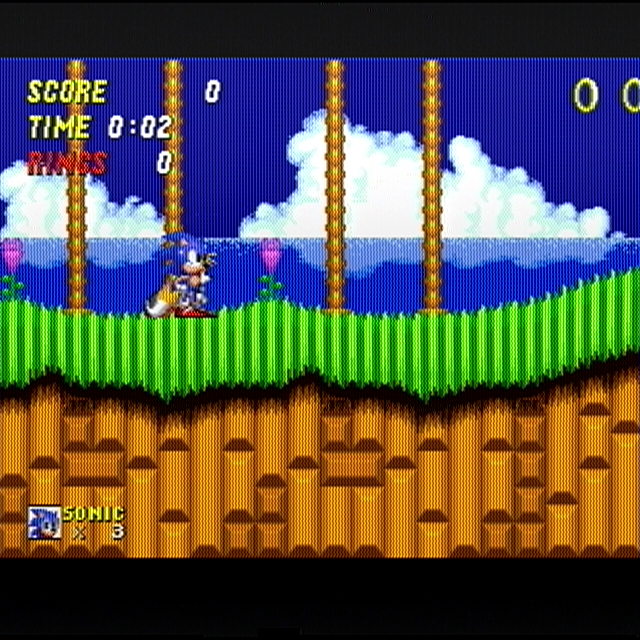
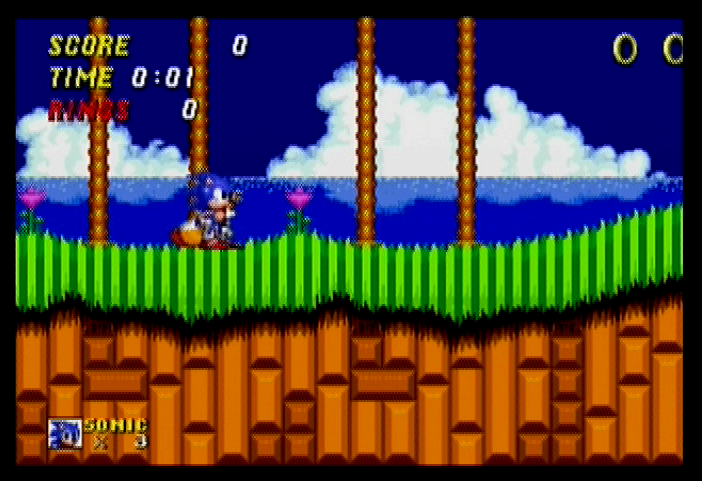
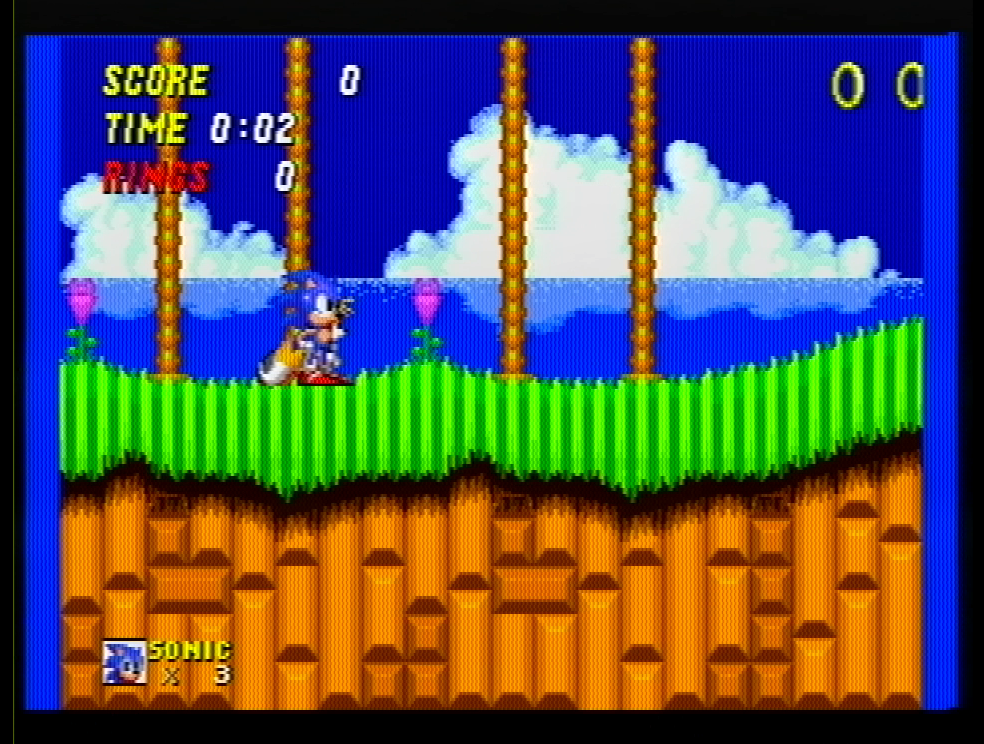
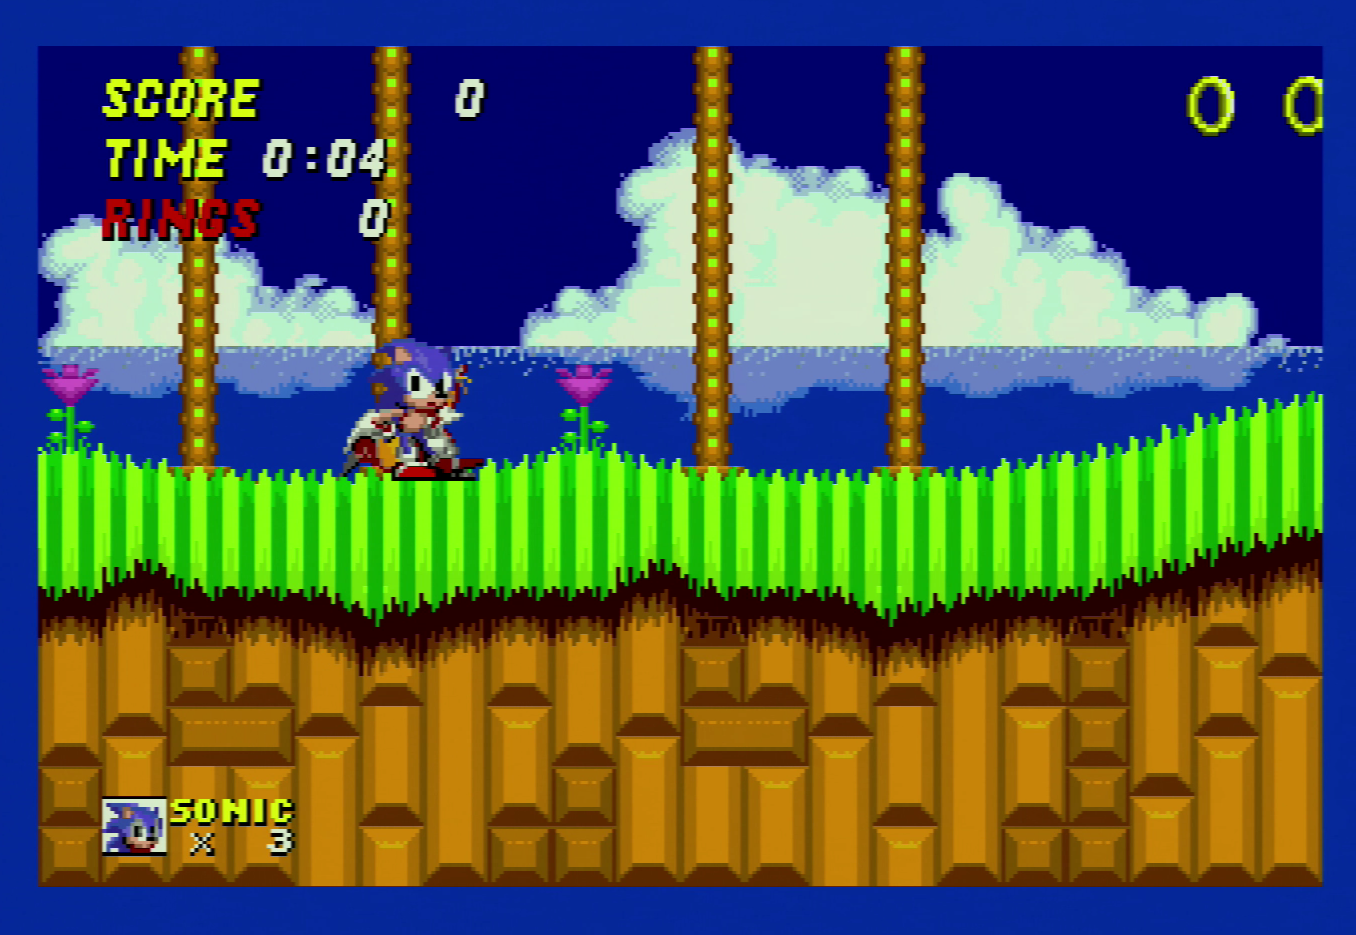
Compare it to Framemeister. Although it’s not as good as images from emulators and the image is just a bit blurred, but all details are now good visible and back:
Mega Drive via AV
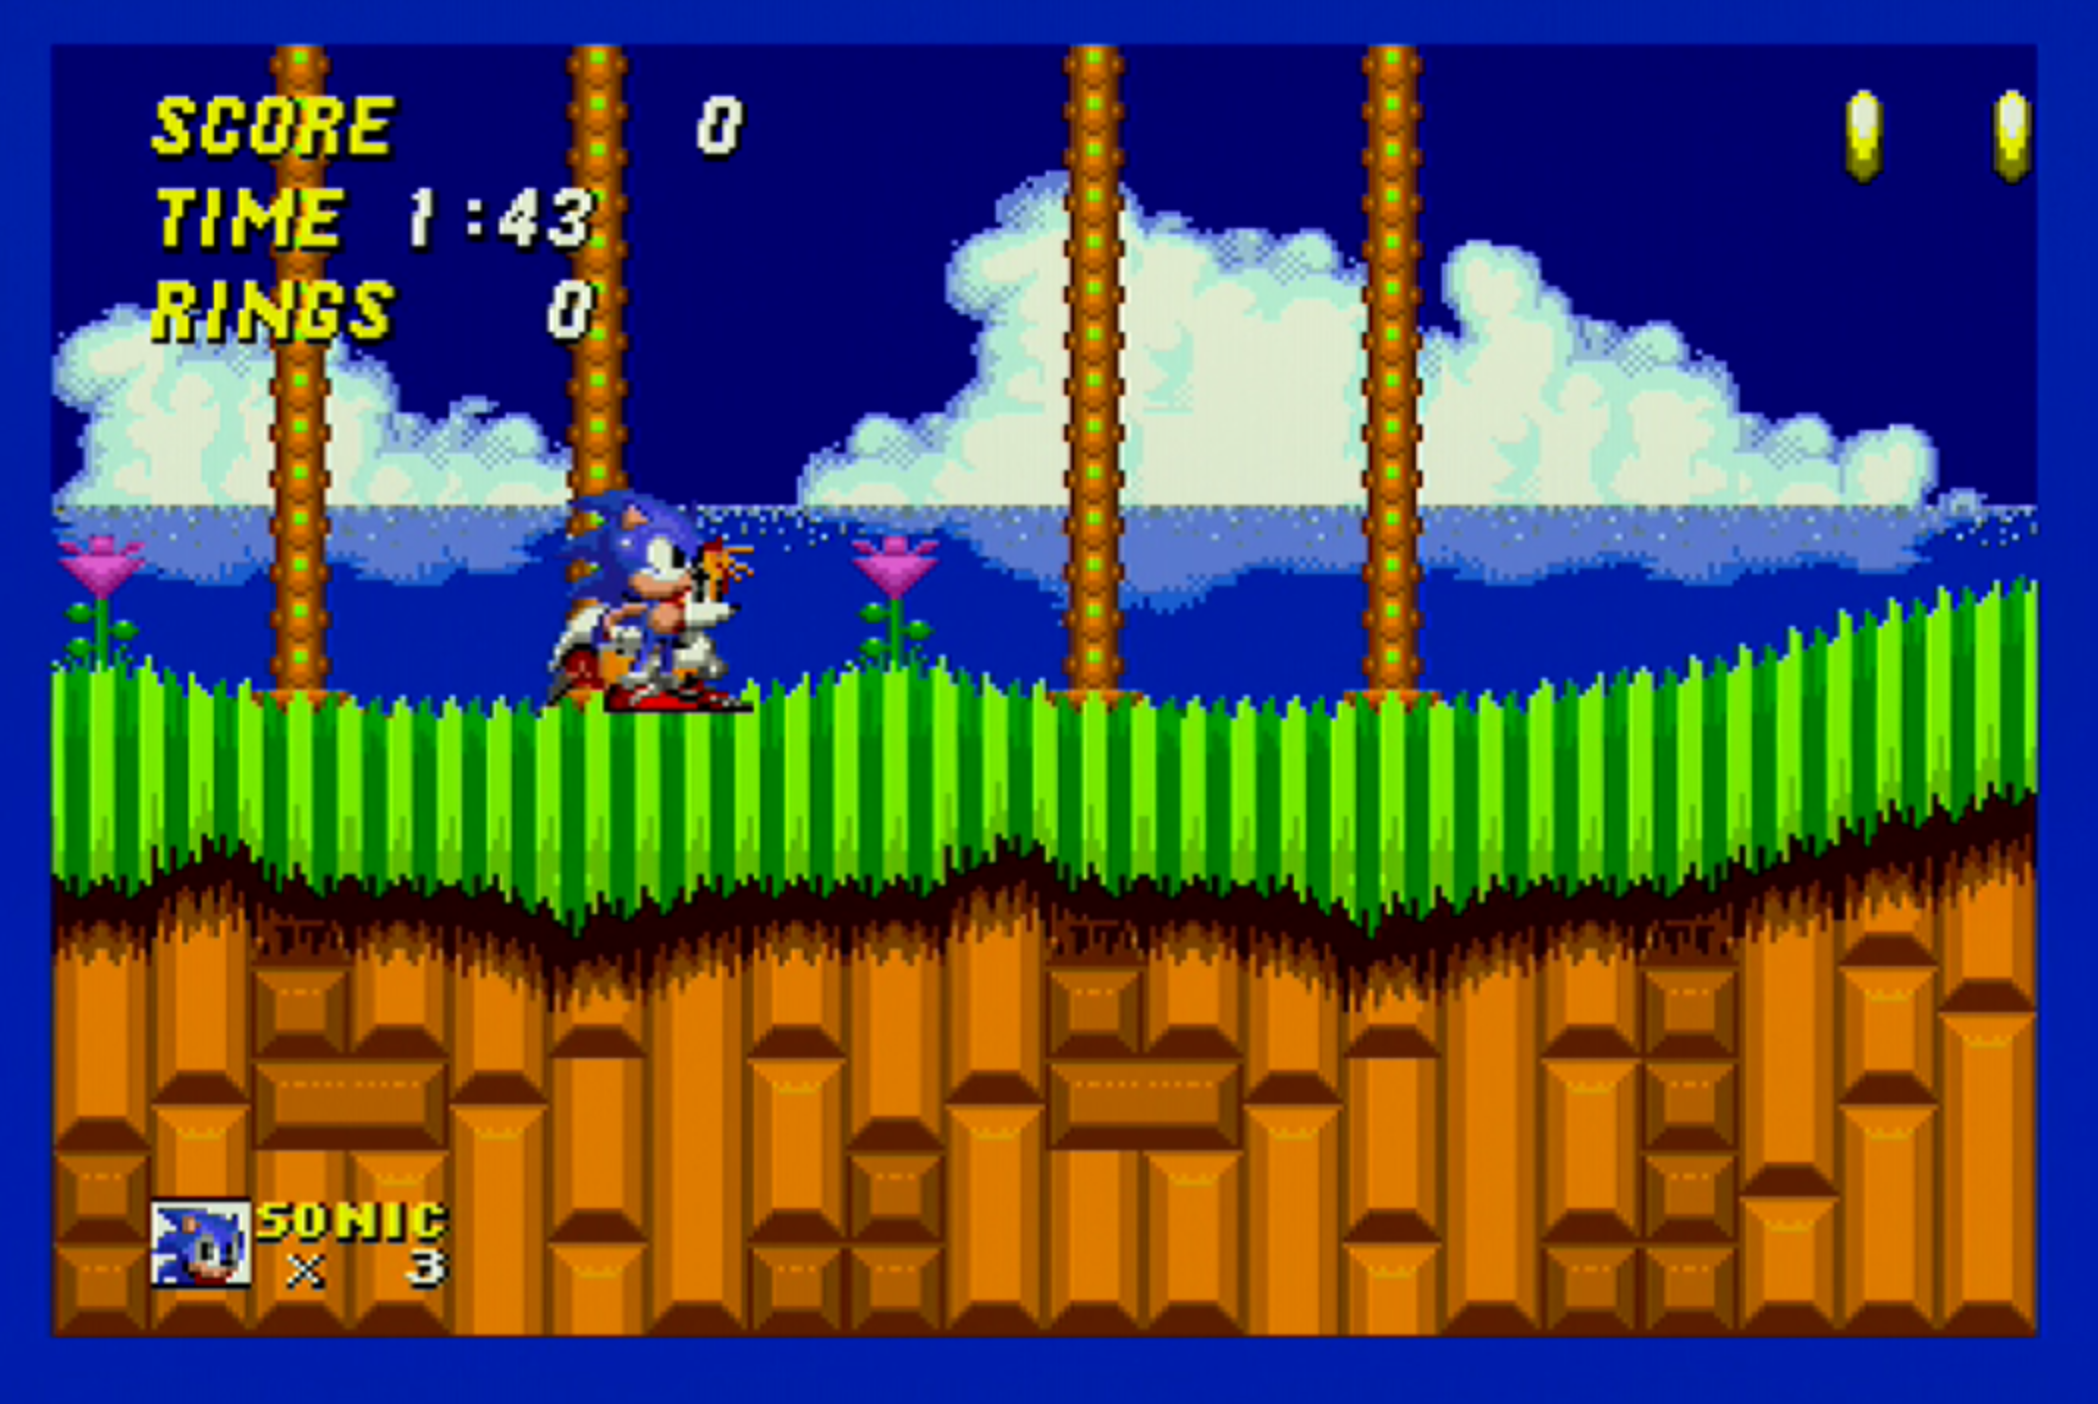
Mega Drive via S-Video
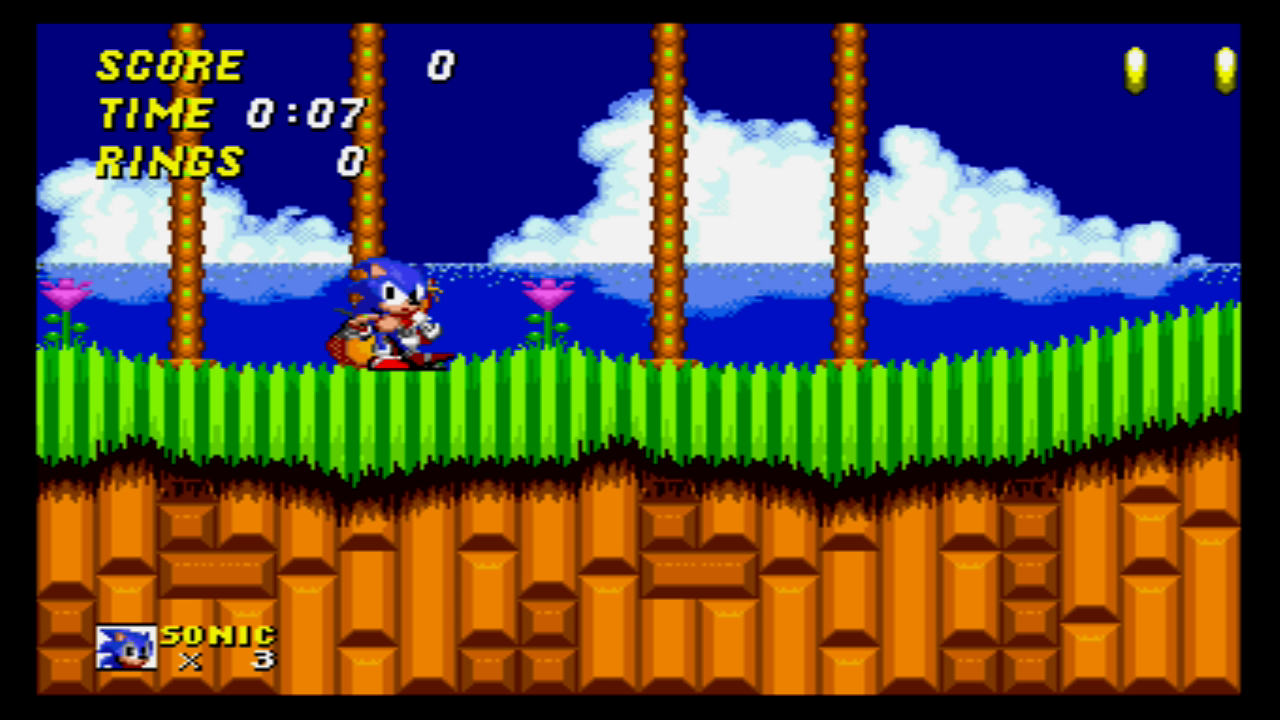
And the nicest of all: Mega Drive via RGB
Here’s to compare with other HDMI solutions (sorry, can’t add RetroTink 2x Screenshot, since I cannot capture it!, but it’s on par on the OSSC in this configuration (line 2x)):
Mega SG

MiSTer
OSSC line2x
Mega Retron HD
Super Retro Trio +
RetroFreak

Mega Drive Mini
Benefits of Framemeister:
- Correct processing of old signals, without unnecessary deinterlacing
- User adjustable high quality upscaling by integer multiplying
- Reduced lag times in comparison to your TV (1-2 frames at max)
- Rich upscaling options for modern monitors, incl. aspect ratio, zooming, picture resizing, position, synchronisation, cropping
- Outputting in HDMI 1.3 (works with almost all modern TVs and monitors), since other output types become obsolete or incompatible (not all TV-Sets have SCART or AV, not to mention S-Video!). Currect OLED LGs only have HDMI inputs, for example.
- Maintains and improves image quality and can apply different effects (scanlines, overlays)
Shortcomings:
- What I personally miss is a separate audio output (rca or 3,5″), which would be great for those, who are using PC monitors without speakers
- Also, saving profiles per input would be great as well
- Using more than 20 profiles!
- Simpler framing (e.g. an option for black frames or borders)
- Price (and it’s getting higher and higher…)
- No direct VGA input
- Changing specific settings can temporarily reset synchronisation and you have to wait for the picture to become visible again; this also happens when the game changes its resolution during the gameplay
Where to buy:
- Solaris Japan, also on Ebay or Amazon, but I recommend the first seller because of clear warranty regulations
Is it any better than a usual cheap upscaler?
If you are on this site, than you know the answer. The answer is: yes, of course! Every usual upscaler (AV to HDMI or Scart to HDMI does the same mistake: wrong recognition of 240p!)
Is it better than OSSC?
In some areas, yes. It is more versatile (e.g. it also allows you to upscale, choose resolutions) and should have better compatibilty (esp. for SNES). Also its deinterlacing capabilities are slightly better. But OSSC is simpler and you can get the same high quiality result in less steps with less configuration. Framemeister also supports HDMI (as input), AV and S-Video. OSSC on the other hand, doesn’t support these, but it supports VGA (Framemeister doesn’t).
Keep in mind: OSSC is only a linedoubler, and Framemeister is an upscaler!
Description
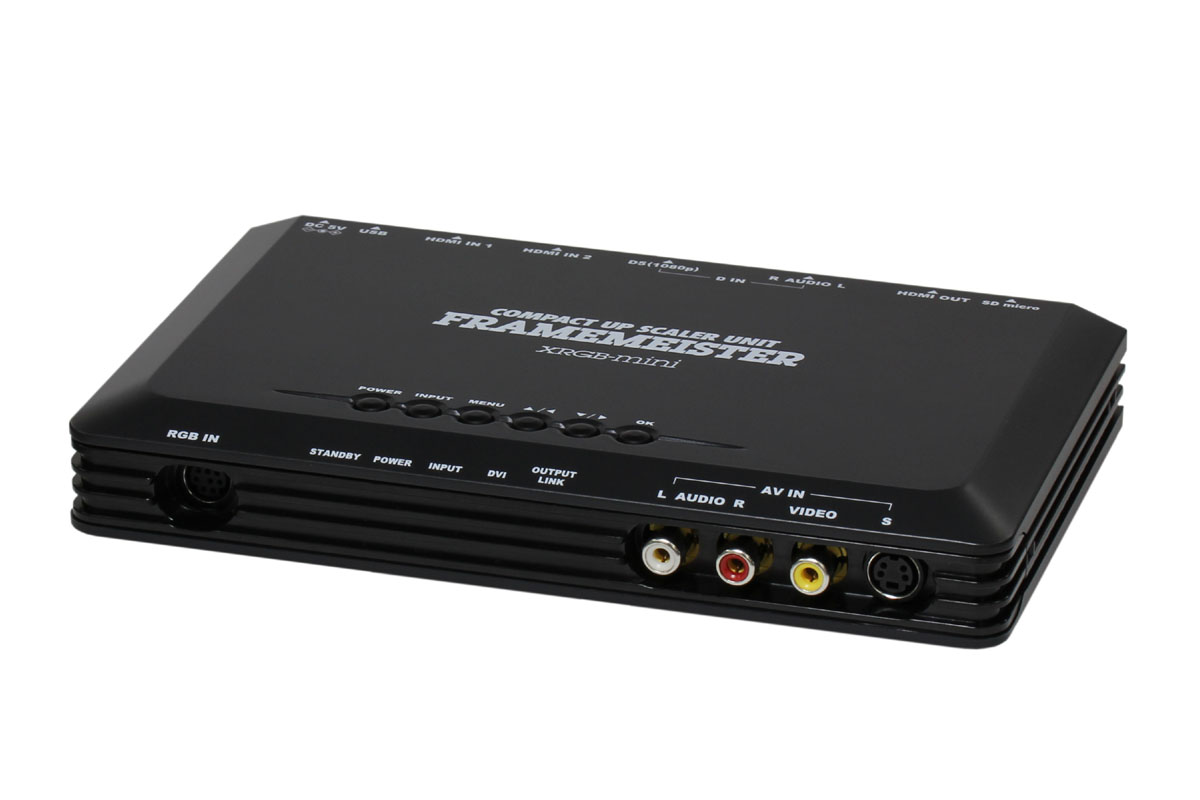
Label on top:
COMPACT UP SCALER UNIT
FRAMEMEISTER
XRGB-mini
Technical data
Video Processing Unit: Marvell QDEO Kyoto G2
Dimensions: 193 x 32,5 x 119 mm
Weight: 290 g + power adapter 120 g
Not compatible audio formats:
- DSD (Direct Stream Digital) 1 bit
- 24 bit audio
- PCM audio format of high resolution (2kHz ~ 192kHz )
Package, accessories, prequisites
Package
The package includes:
- device itself
- power adapter with a japanese plug (Type A), but it has compatible voltages so that it can work with western power outlets with an appropriate adapter. Only first models had japanese voltages and needed another power supply or converters.
- new: depending on kit either an RGB cable adapter JP-21/RGB21 to Mini-Din, which you will need in case you want to use japanese cables or an adapter for normal european SCART cables
- remote control and two batteries for it
- supporting element vor vertical positioning
- paper manuals (in Japanese)
- (in earlier models there was also a micro SD, but it’s no longer included)
Accessories (you will need these)
- D-Terminal to component adapter cable (for PS2, Wii, Xbox and PSP) can be bought together with the Framemeister
- EuroSCART to Mini-Din for european Scart, in case your kit has japanese adapter (which is only compatible with japanese cables) and if you live in Europe it’s unlikely you will have such cables (except you know it for sure, because you have imported japanese consoles). You have now (on solarisjapan) a possibility to buy a kit with a european adapter (like this).
- micro SD Card (for updates and profiles), you won’t need a lot of space. Even below 1GB will be ok.
- Optionally: a sticker with english labels for the remote control (like here)
- HDMI-Cables or adapters if you want to connect via VGA or DVI
Important notes
- Included RGB-IN adapter
The Framemeister uses a custom 8-pin mini-DIN connector for RGB inputs, which accepts adapters for RGB cables (japanese JP21 or European SCART). European users usually will be using (Euro)SCART cables. The Framemeister is shipped with a Mini-DIN to RGB21/JP-21 adapter, which has a different wiring (some pins output voltage!). Please don’t use the (European) SCART cables with the japanese RGB IN adapter that comes bundled with the Mini! Standard SCART is wired differently so you will need a EuroScart-> Mini-Din Adapter or resolder all your cables. Update: You can also order a kit with a european adapter directly from solarisjapan.
- D-terminal
D-terminal is a format used in Japan, which also supports component signals via an adapter (you can buy it separately, be sure to order it with your Framemeister directly!). Plug in the adapter and connect it to your Wii/PS2 component cables (red, green and blue). Connect audio cables (red and white) into the corresponding audio inputs on the back of the unit.
- JP-21 (similar to SCART Cables)
JP-21 is a format which uses the same style connector as a European SCART cable. Although the connectors are the same, the pin layout is different. If you use JP-21 cables (e.g. you have the japanese console), you can use the original RGB-in adapter. Please keep in mind, that european consoles use European SCART cables! Keep it away from your european consoles and label it correspondingly.
- HDMI
This is the best digital format nowadays with a simple design and great compatibility. The Framemeister is compatible with HDMI 1.3. The device also has not only one, but two HDMI inputs, so that you can use it as a hub. If you want to passthrough the hdmi signal without any processing, enable the corresponding option (HDMI_SET->HDMI_1_DIRECT->ON or the same for HDMI 2).
- Power adapter
Check whether the power supply adapter is compatible with your wall socket (before all the voltage). The included power adapter (except the early models) is already compatible with european voltages, but has a japanese plug (Type A), which is not compatible with european sockets (which accept plugs of Type C). You will need either an adapter (Type A to Type C) or another compatible power adapter. Among these are AC adapters for PlayStation Portable or PlayStation TV (I used this one). It has to be 5V, 2A. Check the polarity (same as in the PSP on the picture): <->—(.—<+>.![psp-power-adapter-1[1]](https://arekuse.net/blog/wp-content/uploads/2016/05/psp-power-adapter-11.jpg)

- TV/Monitor inputs
Check whether your monitor or TV-set has appropriate inputs (e.g. HDMI, or when DVI or VGA you will need corresponding adapters).
HDMI->VGA or HDMI->DVI (or even HDMI->AV, but it’s silly) adapters may require additional power via USB (in case you don’t see any picture), but mine worked without extra power.
Inputs and LEDs
Inputs
Front
The front of the mini features (from left to right):
- [RGB IN] – a Mini-Din 8 input which can be used for 15khz, 60Hz RGBs sources. This input is limited to RGB only! You will use this input with consoles, which can output their signals via RGB SCART (you will need the correct adapter for european scart cables!).
- [AV IN] – on the right: composite video [VIDEO] input and analogue stereo audio [L AUDIO R VIDEO] inputs; on the left: s-video [S], which is not that common in Europe but gives sharper image than composite. You will need these inputs for consoles, which cannot output via RGB Scart (NES, Nintendo 64, PC Engine).
Back
On the back we have (from left to right):
- [SD micro]: a micro-SD-slot, used for firmware updates and profiles
- [HDMI OUT]: HDMI output, to output the processed video to the target TV or monitor
- [D-IN]
- [R AUDIO L]: stereo audio inputs, for audio cables of the component cable, which will be used with the D-Terminal input
- [D]: a D-Terminal input, best used with D->Component adapter for component sources (Wii, PS2, PSP)
- [HDMI IN 2, HDMI IN 1]: two HDMI inputs, for your HDMI-compatible devices
- [USB]: mini-USB connection (no usage… or, you can power adapters HDMI->VGA/DVI, in case they need additional power)
- [DC 5V]: for power supply
LEDs (Front)
- [infrared receiver]: used to interact with the remote controls using infrared signals
- Standby: shows the standby mode state
- Power: shows the power state (if the device is on)
- Input: shows the input state (if there is a signal)
- DVI: shows the input mode state (if DVI is chosen)
- OUTPUT LINK: shows the connections status (if the TV Set/monitor is correctly connected to the device)
Buttons and remote control
Buttons
- Power: by pressing (shortly) this button you turn on the device or (pressing for 2-3 seconds) put it into the standby mode. If you change the power mode to “always on”, the button will have no effect and the device will turn on as soon it’s powered.
- Input: using this button you can switch between different sources. The sequence is following: „Video->S->D->RGB->HDMI1->HDMI2->..“
- Menu: opens the main menu and then acts as a „back“ button, when used in the submenus
- Up/Left: navigating in menus, changing values
- Down/Right: navigating in menus, changing values
- OK: select menu option or accept changes
Remote Control
Using the remote control (functions)
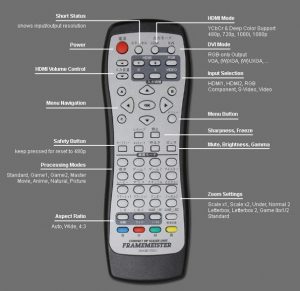

- Power: turn on the device or put it in standby mode
- Short Status: display short status information:
- Input Resolution / Output Resolution / PCM or NOPCM / VLOCK or UNLOC
- HDMI Mode: switch between HDMI resolutions
- HDMI Volume Control: control the volume*
- DVI Mode: switch between DVI resolutions
- [Input Selection]: choose the input
- HDMI1 / HDMI2 / RGB / D (D-Terminal) / S (S-Video) / VIDEO (AV)
- HDMI1 / HDMI2 / RGB / D (D-Terminal) / S (S-Video) / VIDEO (AV)
- [Menu Navigation buttons]
- Menu Button: open the main menu
- Sharpness: control the sharpness
- Freeze: stop the image (for checking purposes)
- Safety Button: keep pressed to reset to the safe 480p setting
- Mute: mute video and audio
- Brightness: control the brightness
- Gamma: control the gamma
- [Processing Modes]: choose the processing mode
- Standard / Game 1 / Game 2 / Meister / Movie / Anime / Natural / Picture
- [Zoom Settings]: choose the scaling option
- Scale x1 / Scale x2 / Unter / Normal 2 Letterbox / Letterbox 2 / Game lbx ½ / Standard
- [Aspect Ratio]: adjust the aspect ratio mode
- Auto / Wide / 4:3
* Note: The volume control is available for embedded PCM only, either from one of the HDMI inputs or from one of the analogue inputs. Some audio formats are not compatible with XRGB-mini.
Detailed Information (buttons and device layout)
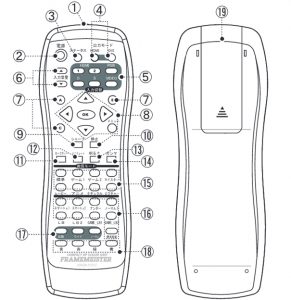

- Infrared transmitter which send infrared signals to the main unit. Make sure the line of sight is clear!
- Power button – turns on or off the device
- Short Status button – shows the simple status information (Input Resolution, Output Resolution, audio format: PCM/NOPCM, sync lock status: VLOCK/UNLOCK)
- Output resolutions for HDMI / DVI
- Input Switch buttons (HDMI, RGB, D, S, VIDEO)
- HDMI input volume button
- Special buttons
- Screen scaling set to x1 and image mode to MEISTER
- Screen scaling set to x2 and image mode to MEISTER
- Scanline options (ON or OFF)
- Menu operations buttons
- Sharpness button
- Freeze button
- Safety button (Video set to 480p (HDMI) or 1024×768 (DVI) and Deep Color and Sync are set to OFF
- AV mute button
- Brightness adjustment button
- Gamma adjustment button
- Image mode buttons (STANDARD, GAME_1, GAME_2, MEISTER, MOVIE, ANIME, NATURAL, PICTURE)
- Screen size settings buttons (SMARTx1, SMARTx2, UNDER, NORMALx2, LB, LB2, GAME_LB1, GAME_LB2, STANDARD)
- Aspect ratio settings button (Auto, Wide, Normal)
- Colored buttons (Blue: reset zoom; Red: zoom overscan; Green: zoom size; Yellow: zoom display on/off)
- Battery department
Main Menu
If the menu text is in grey (=not active), it can’t be changed untill you activate the corresponding option.
- (Top)
- OUTPUT_MODE: you can select the output mode between HDMI and DVI, depending on what kind of monitor and connection you want to use. Default is HDMI.
- HDMI_OUTPUT: set the output resolutions and refresh rate for HDMI output. Default is 480p. Use it, if you have an ordinary TV. Some older european TVs only accept european resolutions.
- 480_60p
- 720_60p
- 1080_60i
- 1080_60p
- 576_50p
- 720_50p
- 1080_50i
- 1080_50p
- DVI_OUTPUT: set the output resolution and refresh rate for the DVI output. Default is 1024×768. Note: even if you set the resolution above 1920×1200, the image area will remain 1920×1080. Use it, if you use a PC monitor and DVI connection.
- 640×480
- 800×600
- 1024×768
- 1280×960
- 1280×1024
- 1600×1200
- 1280×768
- 1280×800
- 1360×768
- 1440×900
- 1600×900
- 1680×1050
- 1920×1080
- 1920×1200 (see notes in the end of the guide for this resolution)
- IMAGE_MODE: select processing and filter mode (deinterlacing, low pass filter, scanlines…)
- STANDARD: this is the default setting
- GAME_1: different processing and enabled low-pass filter (low pass filter decreases quality for analogue sources)
- GAME_2: same as GAME_1, but uses colours from ANIME (low pass filter decreases quality for analogue sources)
- MEISTER: same as GAME_1, but adds scanlines (low pass filter decreases quality for analog sources). Initially the only mode with scanlines, but now you can enable scanlines for every input and mode.
- ANIME: STANDARD without low-pass filter and with increased saturation and contrast
- MOVIE: suitable for video, adds (barely noticeable) noise
- NATURAL: suitable for interlaced sources (use it for 480i)
- PICTURE: suitable for progressive sources and static images (use it for 240p)
- ASPECT_RATIO: can be set to AUTO (decides automatically based on the VBI signal information), Wide (16:9) and Normal (4:3)
- SCREEN_SET: it is different from the previous option; it allows you to change display proportions and scaling; some settings will disable your aspect ratio setting until set back to STANDARD
- STANDARD: this is the normal state, the aspect ratio is applied from the previous menu
- LB: LetterBox format, best for wide-screen television formats
- LB2: same as LB, but adapted for PC resolutions
- GAME_LB1: for portable systems to enlarge the image
- GAME_LB2: same as GAME_LB1, but for PC resolutions
- SMART_X1: scaling the resolution 1:1
- SMART_X2: same as SMART_X1, but doubles the integer scaling
- UNDER: shrinks the output image to fit it to the screen
- NORMAL2: improves the image in 4:3 format
- COLOR_SET: allows you to change different colour settings. Since Framemeister doesn’t process RGB directly, some colours may look a bit off. You can adjust them here.
- BRIGTHNESS
- GAMMA
- BLACK
- HUE
- SATURATION
- RED
- GREEN
- BLUE
- SHARPNESS: don’t go over value 2, leave at 0 or 1
- VISUAL_SET: these options allow you to adjust the display position on the screen
- H_POS: horizontal position. Useful for Mega Drive and NES, since both create vertical lines with garbage on the left.
- V_POS: vertical position. Useful for PAL Mega Drive, since it has some noise in the lower part of the screen
- H_WIDTH: horizontal width (horizontal stretching)
- V_WIDTH: vertical width (vertical stretching)
- SKEW: skew level
- AUTO_SCALER: can be set to OFF, GAME and VIDEO. This one is very important, since it improves quality significantly, depending on the source. GAME is better for analogue 240p singals (NES, SNES), VIDEO is better for component sources (Wii, PS2).
- H_SCALER: only if autoscaler is on OFF. Change manually the horizontal scaling and check that the screen is not blurred.
- V_SCALER: only if autoscaler is on OFF: Change the vertical scaling, check the image quality.
- ZOOM_SET: is used to adjust the zoom settings
- ZOOM: can be set to ON or OFF
- ZOOM_SIZE: scaling the whole screen. You can use it to hide the noise produced by PAL consoles (Mega Drive) on the edges of the screen.
- ZOOM_H_POS: scaling the horizontal position
- ZOOM_V_POS: scaling the vertical position
- ZOOM_WIDTH: scaling the width
- ZOOM_OVERSCAN: scaling the horizontal position if it’s too wide
- ZOOM_RESET: resets all zoom settings
- SYNC_SET: this options allow you to adjust the synchronisation (which is important for timing between the device and the monitor). These options are for experts only!
- SYNC_MODE: you can choose between AUTO and OFF. Please keep on AUTO if the picture is correct to maintain the standard refresh rate
- SYNC_TIME: adjust the synchronisation time when the signal is lost
- SYNC_LEVEL: if the gaming device is very old, it can send very unusual sync signals which are hard to recognise. Here you can change the level of the signal to try to get it correctly.
- H_POLARITY: can be set to OFF and ON and is used to reverse the polarity of the sync signal
- V_POLARITY: can be set to OFF and ON and is used to reverse the polarity of the sync signal
- HDMI_SET
- DeepColor: in case the TV is compatible, you can turn it on (ON). Elsewhere leave on OFF.
- OUTPUT_COLOR: you can choose between AUTO, RGB and Y, Pb, Pr, Y (CB,CR)
- OUTPUT_RANGE: you can choose between STANDARD and LIMITED
- HDMI_1_DIRECT: enable passthrough for HDMI1 (i.e. don’t alter the signal at all)
- HDMI_2_DIRECT: enable passthrough for HDMI2 (i.e. don’t alter the signal at all)
- EDID_OPTION: can be set to AUTO or HDMI. Use, if the image is not stable. This setting needs a reboot of the system.
- EDID_SELECT: try, if you can’t see the image. Default ist AUTO, can be set to INTERNAL. Requires restart.
- TV_HOTPLUG: forces the video output even if not supported. Can be set to OFF or ON
- VIDEO_SET
- VIDEO_FORMAT: you can switch between STD (NTSC and PAL B/L/I/H) and EXT (PAL M/N/60). Additional noise can appear. Only use, if your gaming console requires it.
- PEDESTAL_LVL: only meaningful for formats NTSC M (USA) and NTSC MJ and adjusts the black levels
- C_SHARP_LVL: adjust the sensitivity of the chroma signal in the A/D converter
- MANUAL_Y_FILTER: adjust the sensitivity of the Y filter in the A/D converter. You can set it to AT1 (autofilter broadband) and AT2 (autofilter narrow band), and MANUAL.
- FILTER_LEVEL: if you set the previous menu to MANUAL, you can adjust the Y filter sensitivity
- AUDIO_SET
- AUDIO_LEVEL: adjust the volume level
- HDMI_1_AUDIO: choose between audio sources (instead of HDMI_1 use the analog audio from D Terminal). Can be set to HDMI or D.
- RGB_AUDIO: switch the audio between RGB or VIDEO inputs
- OPTIONS
- POWER_SET: power settings. Can be set to STANDBY or ON. Menu settings can only be stored in STANDBY mode.
- OSD_MODE: enable or disable automatic messages on the screen
- FREEZE: freeze the image
- SCREEN_SOLOR: you can set the background color (BLACK or BLUE) when no image is shown (when there’s no signal)
- AV_MUTE: mute the video+sound. Can be set to OFF or ON
- LANGUAGE: JPN or ENG can be set
- SPECIAL
- A/D_SET: adjustments for A/D Level (analogue/digital converting)
- MANUAL_A/D: enable or disable manual settings (OFF or ON)
- A/D_LEVEL: can only be used with analogue video to fine tune the video quality
- CLAMP_MODE: can be set to STANDARD or SPECIAL, only for special equipment
- SCANLINE: this option allows you to enable virtual scanlines (as in old crt tv-sets)
- SCANLINE: OFF or ON, if you wish to use the scanlines on modes different than MEISTER
- INT_LINE: line position to insert the black line
- INT_SMOOTH: adjustments for values of black lines and pixels adjacent to this line
- DEC_LINE1: brightness level for lines not divisible by integer
- DEC_LINE2: brightness level for lines not divisible by integer
- DEC_SMOOTH: average value of black adjacent to scanlines
- OVERLAY: adds coloured overlay(s) which were used by some monochrome consoles
- OVERLAY: can be set to OFF, H or V; adds an additional layer to the picture
- POINT: colour range from region (can be set from 0 to 7 from top of the screen)
- WIDTH: width of the overlay
- COLOR: colour of the overlay (W(hite), C(yan), M(agenta), B(lue), Y(ellow), G(reen), R(ed))
- DIVIDE_MODE: this option allows you to divide the output image for multiple targets, for large-scale setups
- DIVIDE_MODE: can be set to OFF, x2 or X4
- DIVIDE_ZOOMx2: divide the screen in two pieces
- DIVIDE_ZOOMx4: divide the screen in four pieces
- SPECIAL_POS: shows the position information
- RETRO_MODE: shows the image as if it’s a CRT. Can be set to OFF, L1, L2, L3. Basically it crops the image, adds shadows and rounded corners (many old CRTs had rounded corners).
- COLOR_INVERT: reverse the colours
- A/D_SET: adjustments for A/D Level (analogue/digital converting)
- DATA: using these options you can save or load screen settings
- LOAD_SELECT: choose the profile to load
- LOAD: load the settings from the chosen profile
- SAVE: save actual settings into the chosen profile
- SAVE_NEW: create new profile and save to it
- CPU_UPDATE: only for developers and cannot be used. Please do not use!
- EDID_GET: only for developers and cannot be used. Please do not use!
- RESET: reset to the factory settings
- STATUS: you can display different status messages
- STATUS: show short status on the current video signal
- FULL_STATUS: show detailed status on the current video signal. Scroll between pages with arrow buttons.
- FIRM_VER: shows the firmware version
- PCB_VER: shows the board version
Connecting to TV/Monitor
Connection types and their quality:
- AV Composite / RCA / Composite / Yellow-White-Red: most common format and worst image quality since all image information is transferred via a single channel (Quality 1/5)
- S-Video: better than composite, uses two channels, one for intensity (luminance) and one for color (chrominance), but still far inferior than RGB (2/5)
- RGB (Scart, JP21): the best format for many classic consoles, because all signals are transferred via separate pins (3/5)
- Component: as in RGB, different colors are transmitted via different channels, but this interface also supports higher resolutions (4/5)
- HDMI: the best format, but not available for classic consoles. Best image quality and high resolution. (5/5)
Setup possibilities (simple):
- Console+Composite AV or S-Video->Framemeister->HDMI**->Monitor/TV
- Console+Scart/JP21->RGB* to Mini-DIN->Framemeister->HDMI**->Monitor/TV
- Console+Component->D-Terminal to Component cable->Framemeister->HDMI**->Monitor/TV
- Console+HDMI->Framemeister->HDMI**->Monitor/TV
* Connecting retro consoles
- if you use RGB-21/JP-21 cables then you can use the bundled adapter (note, if you’re not sure what kind of cables you have and you use european consoles, then you have Euro SCART, not RGB21).
- if you use (european) SCART cables then you need to buy a SCART to Mini adapter.
** If your Monitor doesn’t have HDMI:
- Replace HDMI with an HDMI to DVI adapter (like this), separate audio output is recommended (although DVI can theoretically output audio, almost all monitors have no speakers)
- Replace HDMI with an HDMI to VGA adapter (like this), separate audio output is recommended (VGA doesn’t output audio)
Note: separate audio output on the adapter is highly recommended if your monitor doesn’t have built-in speakers. You can connect the adapter to external loudspeakers/sound system or use headphones etc. If you connect to the headphones, consider buying an extension cable with volume adjustment or use an amplifier with such possibility.
Connecting multiple consoles
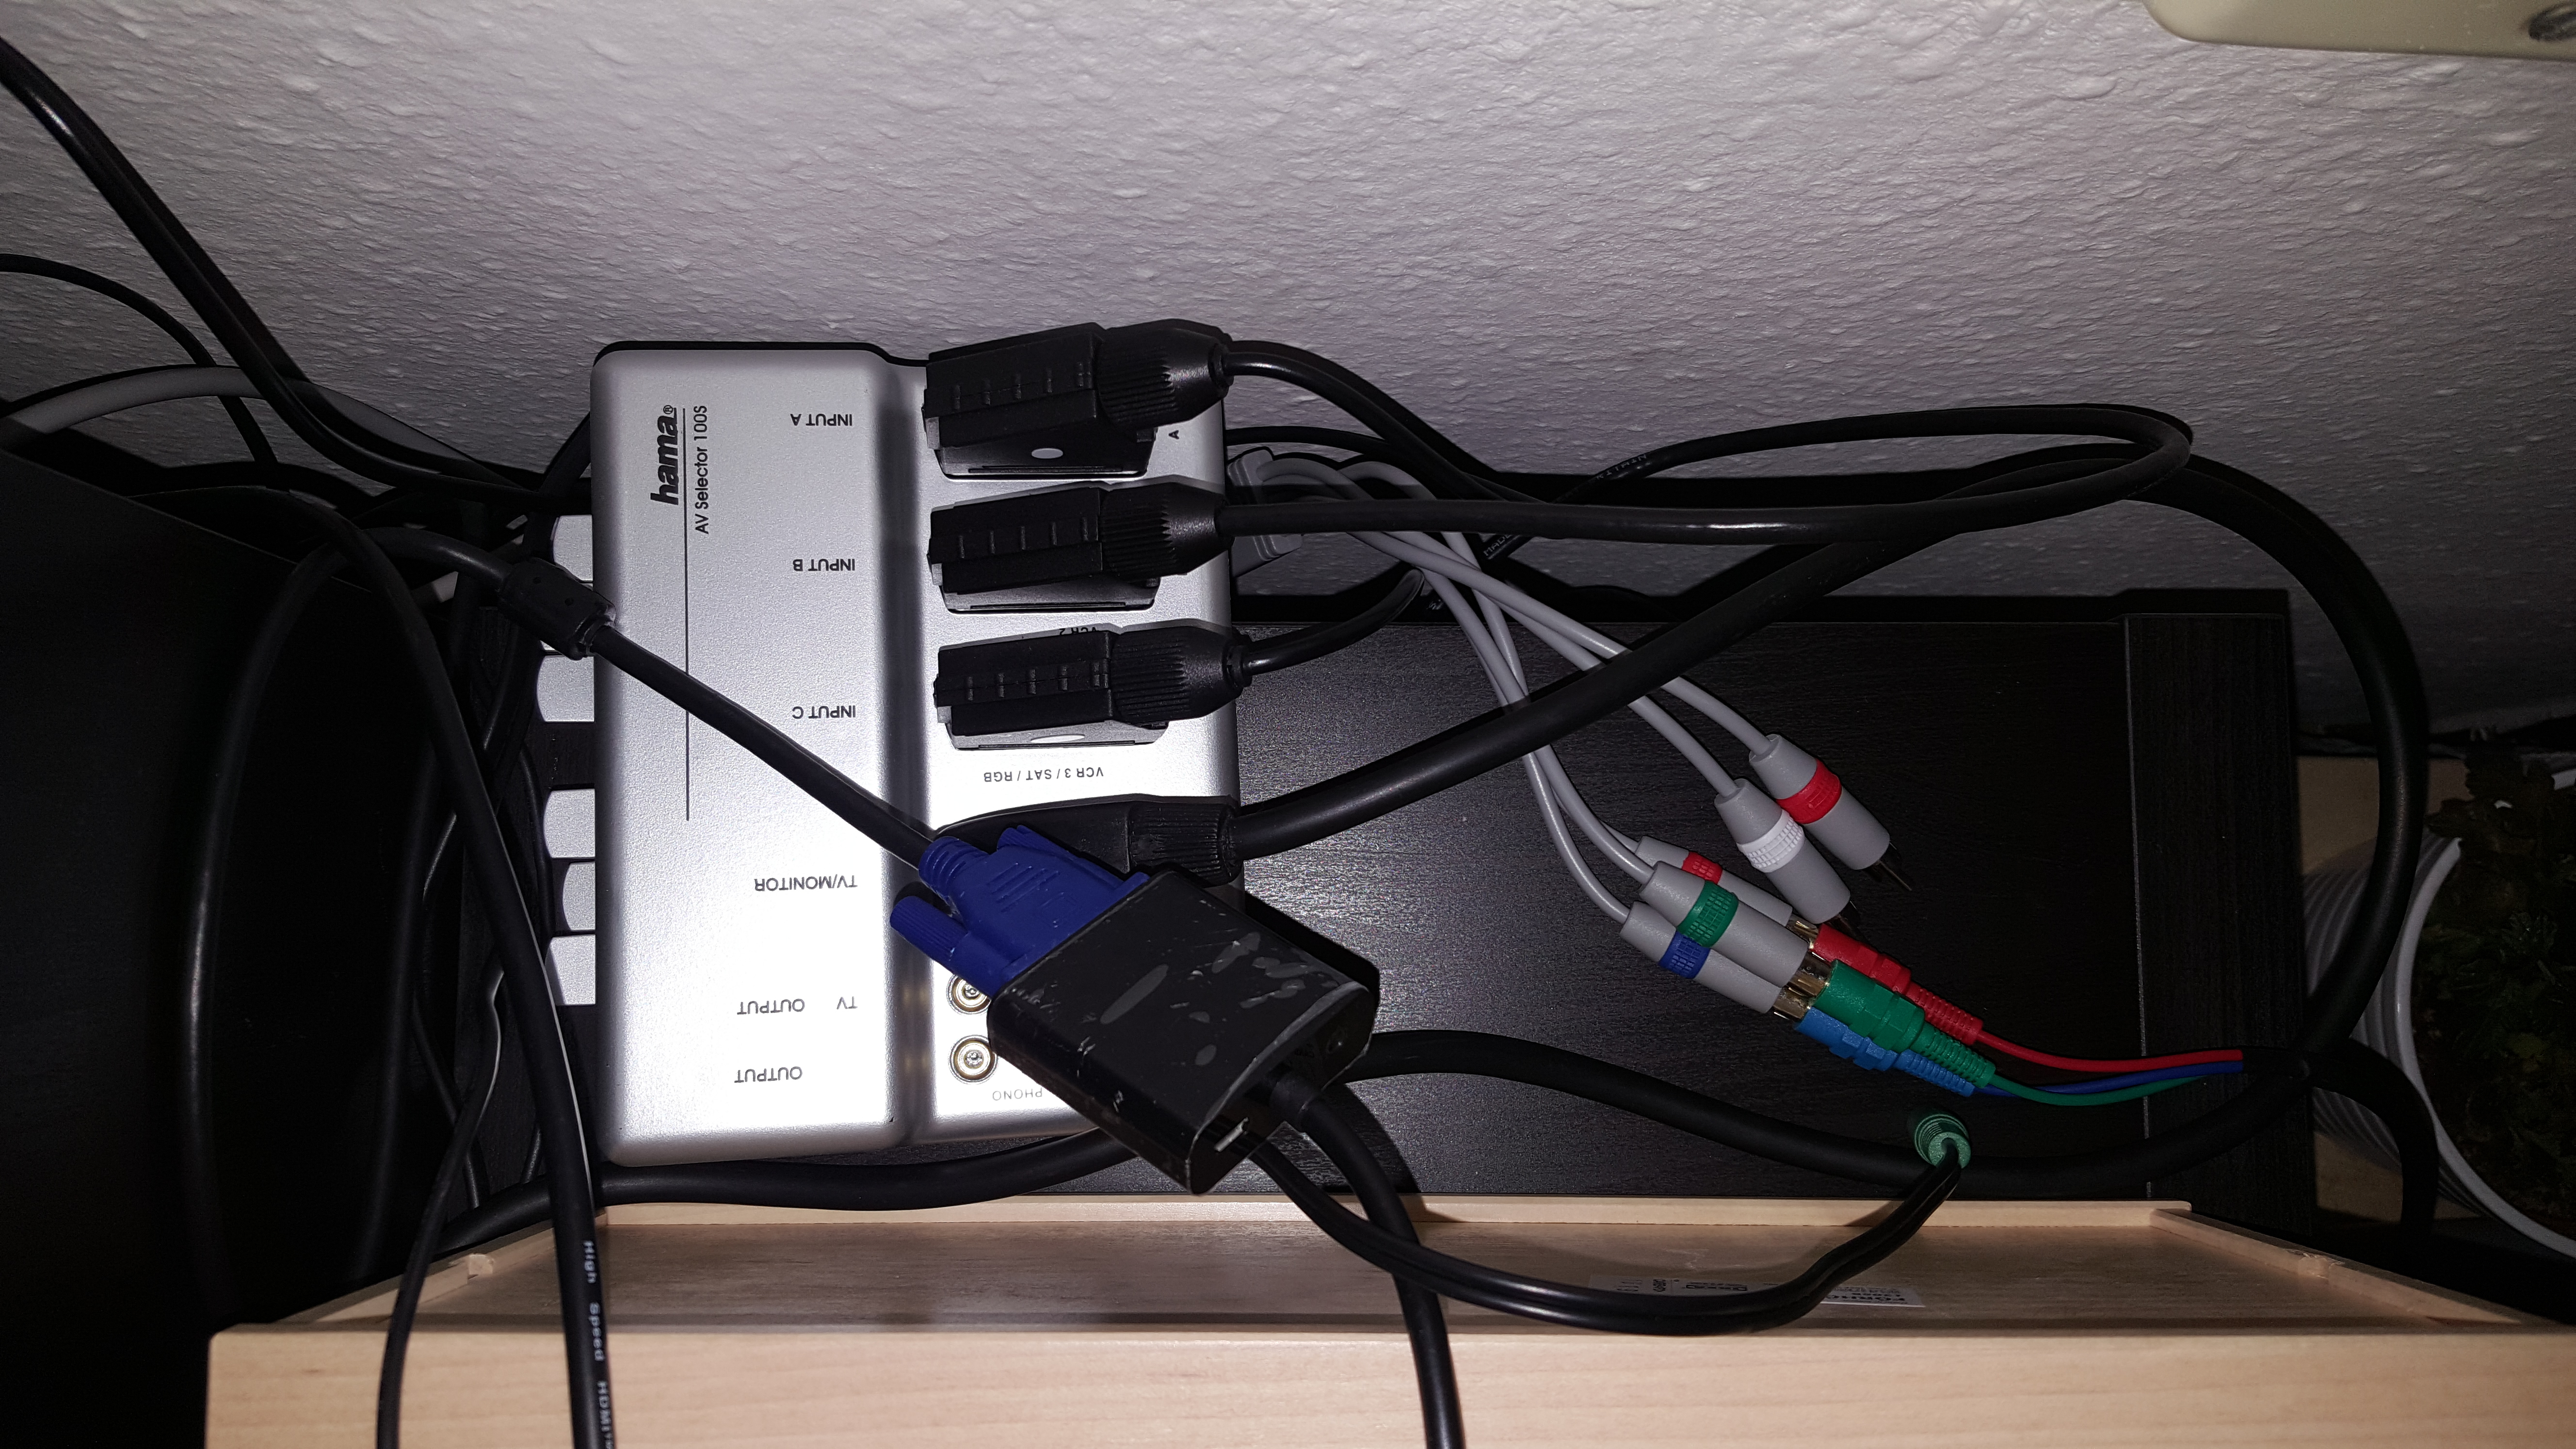
For SCART you can use a SCART hub (it accepts multiple SCART cables and outputs via a single output). You switch between the cables with buttons. Normally such hubs don’t require power. I can recommend the inexpensive Hama AV-100S, with which I had no problems and the image quality isn’t compromised. It also supports RGB-mode! There are also beasts like this Hydra, but it is a bit complicated and is more expensive.
You connect multiple consoles to this hub and the cable from the OUTPUT goes to the Framemeister’s RGB adapter. No need to plug/unplug SCART cables anymore. This particular adapter from Hama also allows capture and output of audio via two RCA cables. You can connect the hub to a sound system or headphones (though you can’t adjust volume via Framemeister because the signals come directly from SCART).
The same applies to all other inputs, but since the connectors are not so sensitive and complicated, you don’t have to use adapters for them. There are basic and cheap composite AV hubs (3 to 1, e.g.) like this, but the image quality can suffer a bit. You will need an AV switcher only if you want to connect multiple AV cables at the same time (NES and N64 and some other consoles). AV connectors are pretty comfortable, you can plug in and out very quickly without any damage. The same applies to component cables, it’s very easy to plug/unplug the cables. SCART is much more sensitive and hard to connect and disconnect.
As for HDMI, it’s your choice. Maybe the two HDMI inputs on the Framemeister are enough. If not, you can use a simple hub.
So, all in all, I only recommend using a hub for SCART connectors.
Best setup configurations (expert):
General note: whenever possible, use SCART over composite (in case only these two are available)! The image quality of SCART is much much better!
If the image it too wide/narrow/not full, etc. use the settings to adjust it. Different regions, formats, monitors, bugs etc. can affect the image and you need to remember, that it will never be 1:1 on your monitor! Many consoles also add noise and flickering on the sides, which were not visible due to the CRT architecture. Framemeister is capable to remove such artifacts.
Classic consoles:
- Commodore 64: composite or S-Video. See also this guide
- ATARI 2600: You will need to mod your console for composite, s-video or RGB via Scart
- NES/Famicom: composite (or Euro SCART when modded)
- Note: NES outputs mono only, you will need a mono->stereo splitter to get sound from both speakers (or your TV set can be configured to output mono on both speakers). Your headphones will need this kind of splitter.
- Famicom need to be modded, since it uses RF
- Dendy: composite (Euro SCART when modded)
- NEC Turbo Grafx 16: composite
- NEC PC Engine Duo: JP-21
- Sega Master System: Euro SCART
- Sega Mega Drive (II)/Genesis/32X/CD: Euro SCART
- Super Nintendo Entertainment System/Super Famicom: Euro SCART
- Note: Make sure you have the correct RGB cable, since SNES only works with its own cable. If you use a different cable, fade outs may occur (e.g. SCART from N64 or GameCube). Also, the cables with luma sync are better and remove the checkerboard patterns.
- Neo Geo MVS: Euro SCART
- 3DO: S-Video or composite
- PlayStation (One): Euro SCART
- Sega Saturn: Euro SCART
- Nintendo 64: Composite (Euro SCART when modded)
- Sega Dreamcast: Euro SCART
- Sony PlayStation 2: Component*
- Microsoft Xbox: Component*
- Nintendo GameCube: Euro Scart (or, if you’re lucky to have one: component; in this case you will also need a composite cable for audio, since the component cable only has video inputs; see also this)*
Modern Consoles:
- Sony PlayStation Portable: Component*
- Nintendo Wii: Component*
- Microsoft Xbox 360: HDMI**
- Sony PlayStation 3: HDMI**
- Ouya: HDMI**
- Raspberry Pi: HDMI**
- PlayStation TV: HDMI**
- Nintendo Wii U: HDMI**
- Nintendo Switch: HDMI**
- PlayStation 4/PlayStation 4 Pro: HDMI**
- Xbox One/Xbox One S/Xbox One X: HDMI**
- PC/Steam device/Android devices: HDMI**
Modern Clones:
- Modern clones, like Retron 5, Retro Freak, Retron 1 HD, AVS oder Analogue Nt, Super Nt use HDMI cables
- Super Retro Trio can be connected via composite or S-Video
- NES Classic Mini, SNES Classic mini use HDMI cables
* Usually your TV set does a good job with component sources. Consider connecting, if your TV-set doesn’t have component inputs, you’re using a monitor or you want extras like scanlines.
** Usually your TV set does a good job when used with HDMI sources. It is the best option, actually. Consider connecting, if you want to use Framemeister as switch (2 HDMI in, 1 HDMI out) or you need extras like scanlines.
Overall Compatibility (Video Output)
Many of the listed platforms need to be modified in order to be compatible with the Framemeister!
Not mentioned are numerous android consoles with HDMI output (like Ouya, Raspberry, Nvidia Shield, etc.)
Home consoles
- Atari 2600
- Atari 500
- Atari 7800
- Atari Jaguar
- Microsoft Xbox
- Microsoft Xbox 360 (and slim versions)
- Microsoft Xbox One / Microsoft Xbox One S / Microsoft Xbox One X
- NEC PC Engine/NEC Turbo Grafx 16
- 3DO
- Nintendo NES / Famicom
- games for Nintendo GameBoy (normal and Color) (via Super Game Boy and GameBoy Player and GameCube)
- games for Nintendo GameBoy Advance (via GameBoy Player and GameCube)
- Nintendo Super NES / Super Famicom
- Nintendo 64
- Nintendo Gamecube
- Nintendo Wii
- Nintendo Wii U
- Nintendo Switch
- Nintendo Classic Mini: NES
- Nintendo Classic Mini: SNES
- Sega Master System
- Sega Genesis / MegaDrive
- Sega Sega CD / Mega CD
- Sega Saturn
- Sega Dreamcast
- SNK Neo Geo AES
- Sony PlayStation (and slim versions)
- Sony PlayStation 2 (and slim versions)
- Sony PlayStation 3 (and slim versions)
- Sony PlayStation 4 (and slim) /PlayStation 4 Pro
- Sony PlayStation Portable
- Sony PlayStation TV
Computers
- Commodore Amiga
- Commodore C64
- Sinclair ZX Spectrum
Arcade Boards
- Capcom CPS
- Capcom CPS-II
- Capcom CPS-III
- Irem M92
- Sega System 16
- Sega System 18
- Sega System 32
- Sega Naomi
- Sony ZN-1
- Sony ZN-2
- SNK Neo Geo MVS
Using Framemeister
First start
- Connect your console to the device
- Connect the device to your TV-set/monitor or AV-receiver
- Plug the AC-Adapter into the Framemeister and then connect the plug to the wall socket
- Press [Power]
When first connected to a TV set/monitor, the Framemeister is set to a compatible 480p output. Using the on-screen menu (you can use the buttons on the device or on the remote control), the resolution for the HDMI output can be changed to 480p, 720p, 1080i and 1080p (with different refresh rates). Micomsoft doesn’t recommend using the 1080i resolution because of the prolonged processing time (480i->480p->1080p->1080i).
You can put the device horizontally or vertically (using the supporting element).
How to switch the resolution:
- HDMI: [Menu button]->[HDMI_OUTPUT]
- DVI: [Menu button]->[DVI_OUTPUT]
How to switch the language:
- [Menu Button]->[Options]->[Language]
How to switch the mode:
- [Menu Button]->[IMAGE_MODE]
If the first picture is really bad for your taste, be sure to check the AUTO_SCALER option, which improves the quality significantly.
Updating Firmware
Following instructions are taken from this site.
The update process is simple. You need a micro SD Card and a PC/Mac to download, unpack and copy files. The update takes about 30 seconds. Please wait, until all lights stop blinking! Remove or insert the SD card only when the device is turned off. Use the FAT32 format for best compatibility. Don’t use SDHC if you encounter problems. You Mac/Windows can leave a lot of garbage files (aka System Volume Information), you can remove them with Linux.


You can also find the OSD-Menu tables on this site.
How to upgrade/downgrade the firmware?
- Download the firmware from the official website.
- Unzip and put the [XRGBMini FOLDER] on the Micro SD card into the root folder.
- Turn off the Mini and unplug it from the power adapter.
- Insert the SD Card into Mini (on the back).
- Plug power adapter into the Mini.
- Green lights will flash alternately, then pulse. Wait!
- The process is complete when the red power light is the only lit on, and pulses slowly on and off.
- Remove the SD card and power the Mini back on. Check the version.
- Note : You may downgrade or upgrade to any version.
Recommended initial settings
Following instructions are taken from this site. Use them to get the best image quality.
In short:
for 240p -> Image_Mode = PICTURE and Auto_Scaler = GAME
for interlaced -> Image_Mode = Natural and Auto_Scaler = Video
for 240p sources
- IMAGE_MODE = PICTURE
- AUTO_SCALER = GAME
- SHARPNESS = 0 or 1 (0 recommended)
- Set the output resolution to 720p if you want to use scanlines or 1080p if your TV supports it and you DON’T want to use scanlines
for 480i sources
- IMAGE_MODE = NATURAL
- AUTO_SCALER = VIDEO
- SHARPNESS = 0 or 1 (0 recommended)
for 480p sources
Either use the Smart x2 mode which basically just doubles the resolution (which means the picture does not fill the screen):
- IMAGE_MODE = PICTURE
- AUTO_SCALER = OFF
- H_SCALER = 6 or 7
- V_SCALER = 6
- SHARPNESS = 0 or 1
or use a normal aspect ratio with the following settings:
- H_SCALER = 7
- V_SCALER = 5
- SHARPNESS = 0 or 1 (0 recommended)
for component video inputs
The default picture settings for component video aren’t great. If you find the picture colours look oversaturated, try the settings below:
COLOR_SET:
- Brightness: 32
- Gamma: 15
- Black: 0
- Hue: 46
- Saturation: 24
SPECIAL:
- A/D_LEVEL: 131
Using Profiles
You can save profiles with specific settings (like scanlines type) on an SD card.
See this page for profiles (following instructions are also taken from this page).
The Framemeister ONLY allows 20 profiles to be shown on the menu screen!
Loading Profiles:
- To use profiles simply place the BIN file in the “EEPDATA” folder on the micro SD card. You can ‘arrange’ the order by manually placing each profile in the order you want into the folder.
- Place the micro SD card back into the Framemeister. If your Framemeister is on, it will recognize the profiles. If not, you may need to reboot the Framemeister.
- Scroll down the menu list and select DATA->LOAD_SELECT. This will bring up the list of profiles on the microSD card.
- When loading a profile from the list, you’ll be given an input option to load the profile into. Obviously you’ll want to select the correct one. If you’re loading an RGB profile, select that input when asked. Likewise, remember to select “D” when loading a component video profile.
- Remember that as of 2.00a, the profiles do not save whether ZOOM is turned on or off. In order for these profiles to work, ZOOM MUST be turned on!
Saving Profiles:
- Be sure you have the micro SD card in and active. This requires a double-reboot of the Framemeister for it to detect it if you removed it at any point.
- Once you have all your settings just as you want them for a given console input, bring the Framemeister menu up and scroll down to DATA.
- You can select SAVE_NEW and use it to save your profile. Use SAVE to overwrite an existing profile.
- New profiles will be saved as “EEP001.BIN” and so on. You can see it in the LOAD_SELECT list to confirm.
- You can remove the micro SD card from the Framemeister while it is on to load the card on your computer. This will allow you to rename the profiles. BE AWARE that you can only use 8 characters in the name as that’s all that will show up on the Framemeister’s menu! Once you are finished editing the file names, you can place the micro SD card back into the Framemeister, and it will recognize the files without needing to reboot.
Various Hints
(These hints are taken from here and here)
Device Menu
The main menu lets you adjust the processing mode, scaling, position, aspect, colours, HDMI, sound, zoom – and many more settings, many of which also accessible from the remote control. Be sure to check the scaling options! Almost all settings can be saved as a profile to be loaded later. The list of menu options (for v2.03) can be downloaded from here. You can access the menu from the remote or using the button on the device itself.
Image Processing Modes
Image Mode
The option IMAGE_MODE allows you to select the image processing algorithms (deinterlacing type, low pass filter, scanlines). These setting don’t affect the scaling or zoom.
| Mode | De-Interlacing | Low-Pass Filter | Scanlines | Notes |
| STANDARD | Motion/Pixel Adaptive | Yes | No | use NATURAL unless the source is extremely noisy |
| GAME1 | Linear/Bob | Yes | No | causes vertical shaking and doesn’t reduce the lag |
| GAME2 | Linear/Bob | No | No | same as GAME1 but with colours from ANIME |
| MEISTER | Linear/Bob | Yes | Yes | initially the only mode with scanlines; now they can be used in all modes |
| ANIME | Motion/Pixel Adaptive | No | No | Boosts saturation and contrast |
| MOVIE | Motion/Pixel Adaptive | No | No | Minor colour differences (adds noise, accord. to the manual) |
| NATURAL | Motion/Pixel Adaptive | No | No | best for interlaces signals (480i, 576i, 1080i) |
| PICTURE | 2:2 Pulldown | No | No | best for progressive signals (240p, 480p, 720p, 1080p) and static images |
Note: the low pass filter can decrease the picture quality on analogue signals. Not recommended .
The field-based deinterlacing mode (Linear/Bob) will cause visible vertical shaking (the so-called bobbing effect). You get less lag but compromise the quality.
The option PICTURE is suited for progressive signals. If you use it with interlaced signals, the missing lines will be duplicated. The animation will look awful, but static images will look ok.
NATURAL is best for interlaced signals.
Explanation: MOVIE, ANIME and NATURAL use the same deinterlacing method. In ANIME the contrast and saturation are boosted a bit. Modes GAME_1, GAME_2 and Meister use less simple deinterlacing method (field-based deinterlacing), thus the lag is less, but the image quality is not that good. GAME_1 uses standard colour settings whereas GAME_2 uses those from Anime. In MEISTER mode the GAME_1 is used and scanlines are applied. PICTURE is just a 2:2 deinterlacing for static images. By the way, the mode MEISTER has become obsolete, since the scanlines can be enabled in every mode and this mode uses a poor deinterlacing mode and the low pass filter.
Scaling Possibilities
Auto Scaler
Selecting VISUAL_SET from the menu will reveal an AUTO_SCALER setting. The available options here are OFF, GAME and VIDEO. If OFF is selected then the Framemeister will allow for the scaling to be manually adjusted across both axes via the H_SCALER and V_SCALER options. Otherwise, it applies the following presets:
- GAME: H_SCALER = 6, V_SCALER = 6
- VIDEO: H_SCALER = 6, V_SCALER = 5
The GAME mode – which happens to be the default – is suitable for 240p sources.
The VIDEO mode is best suited to 480i/480p sources. The image quality for Wii or PS2 will be improved radically.
TV Scaling
The scaling options are very versatile and useful. But they can be corrupted by the internal scaling of your TV or monitor. Stick to these two simple rules to maintain the quality:
- Rule 1: if set to output 1080p then the TV must not apply overscan
- Rule 2: if set to output 720p or less then the TV should scale the image to occupy exactly 960 pixels vertically
Zoom Options
You can set the zoom on 1:1 (for 480i/p) or 2:1 (for 240p). Standard is best used with formats 4:3, and Normal 2 will keep the pixel ratio. The Letterbox mode is used in games with the aspect ratio 4:3 letterbox and there are only a couple of them.
Sync Mode
This option affects the frequency of the output signal. After setting it to OFF the device will use the standard frequency. On AUTO the output signal will match the frequency of the input signal, even if it’s not compatible with the HDMI formats. This is the so-called framerate lock or output frame lock.
It’s better to leave the option on AUTO. If frequencies don’t match, the image may become shaky. But many older consoles (especially PAL after 60hz upgrades) have very different or not stable frequencies which cannot be accepted by the modern TVs. You can set the Sync Mode to OFF and be content the shaking image.
Resolution 1200
Unfortunately, the XRGB-Mini doesn’t offer full support for resolutions 1600×1200 or 1920×1200. Although you can choose them in the menu for DVI, the image of the game will be output as 1080. For images with 16:9, which are output on monitors with resolutions 1920×1080 with aspect 16:10 or 1600×900 with aspect 4:3 it’s ok, but aspect 4:3 on 1440×1080 will have thick black borders on both sides.
Sharpness Settings
The sharpness slider can be adjusted from 0 to 32. It should be set to 0 for everything from 480p to 1080p. On 240p and 480i it can be set to 1. For Nintendo 64 you can change it to a higher values.
240p Signals
The 240p signals are accepted and processed correctly on all inputs. No deinterlacing! It doesn’t matter, which processing mode is chosen, Standard or Game. You can make the image sharper by choosing another resolution (480p, 720p or 1080p). Of course, the most sharp image is on the 1080p, but it’s not the best resolution for scanlines. Choose 720p if you want to use scanlines.
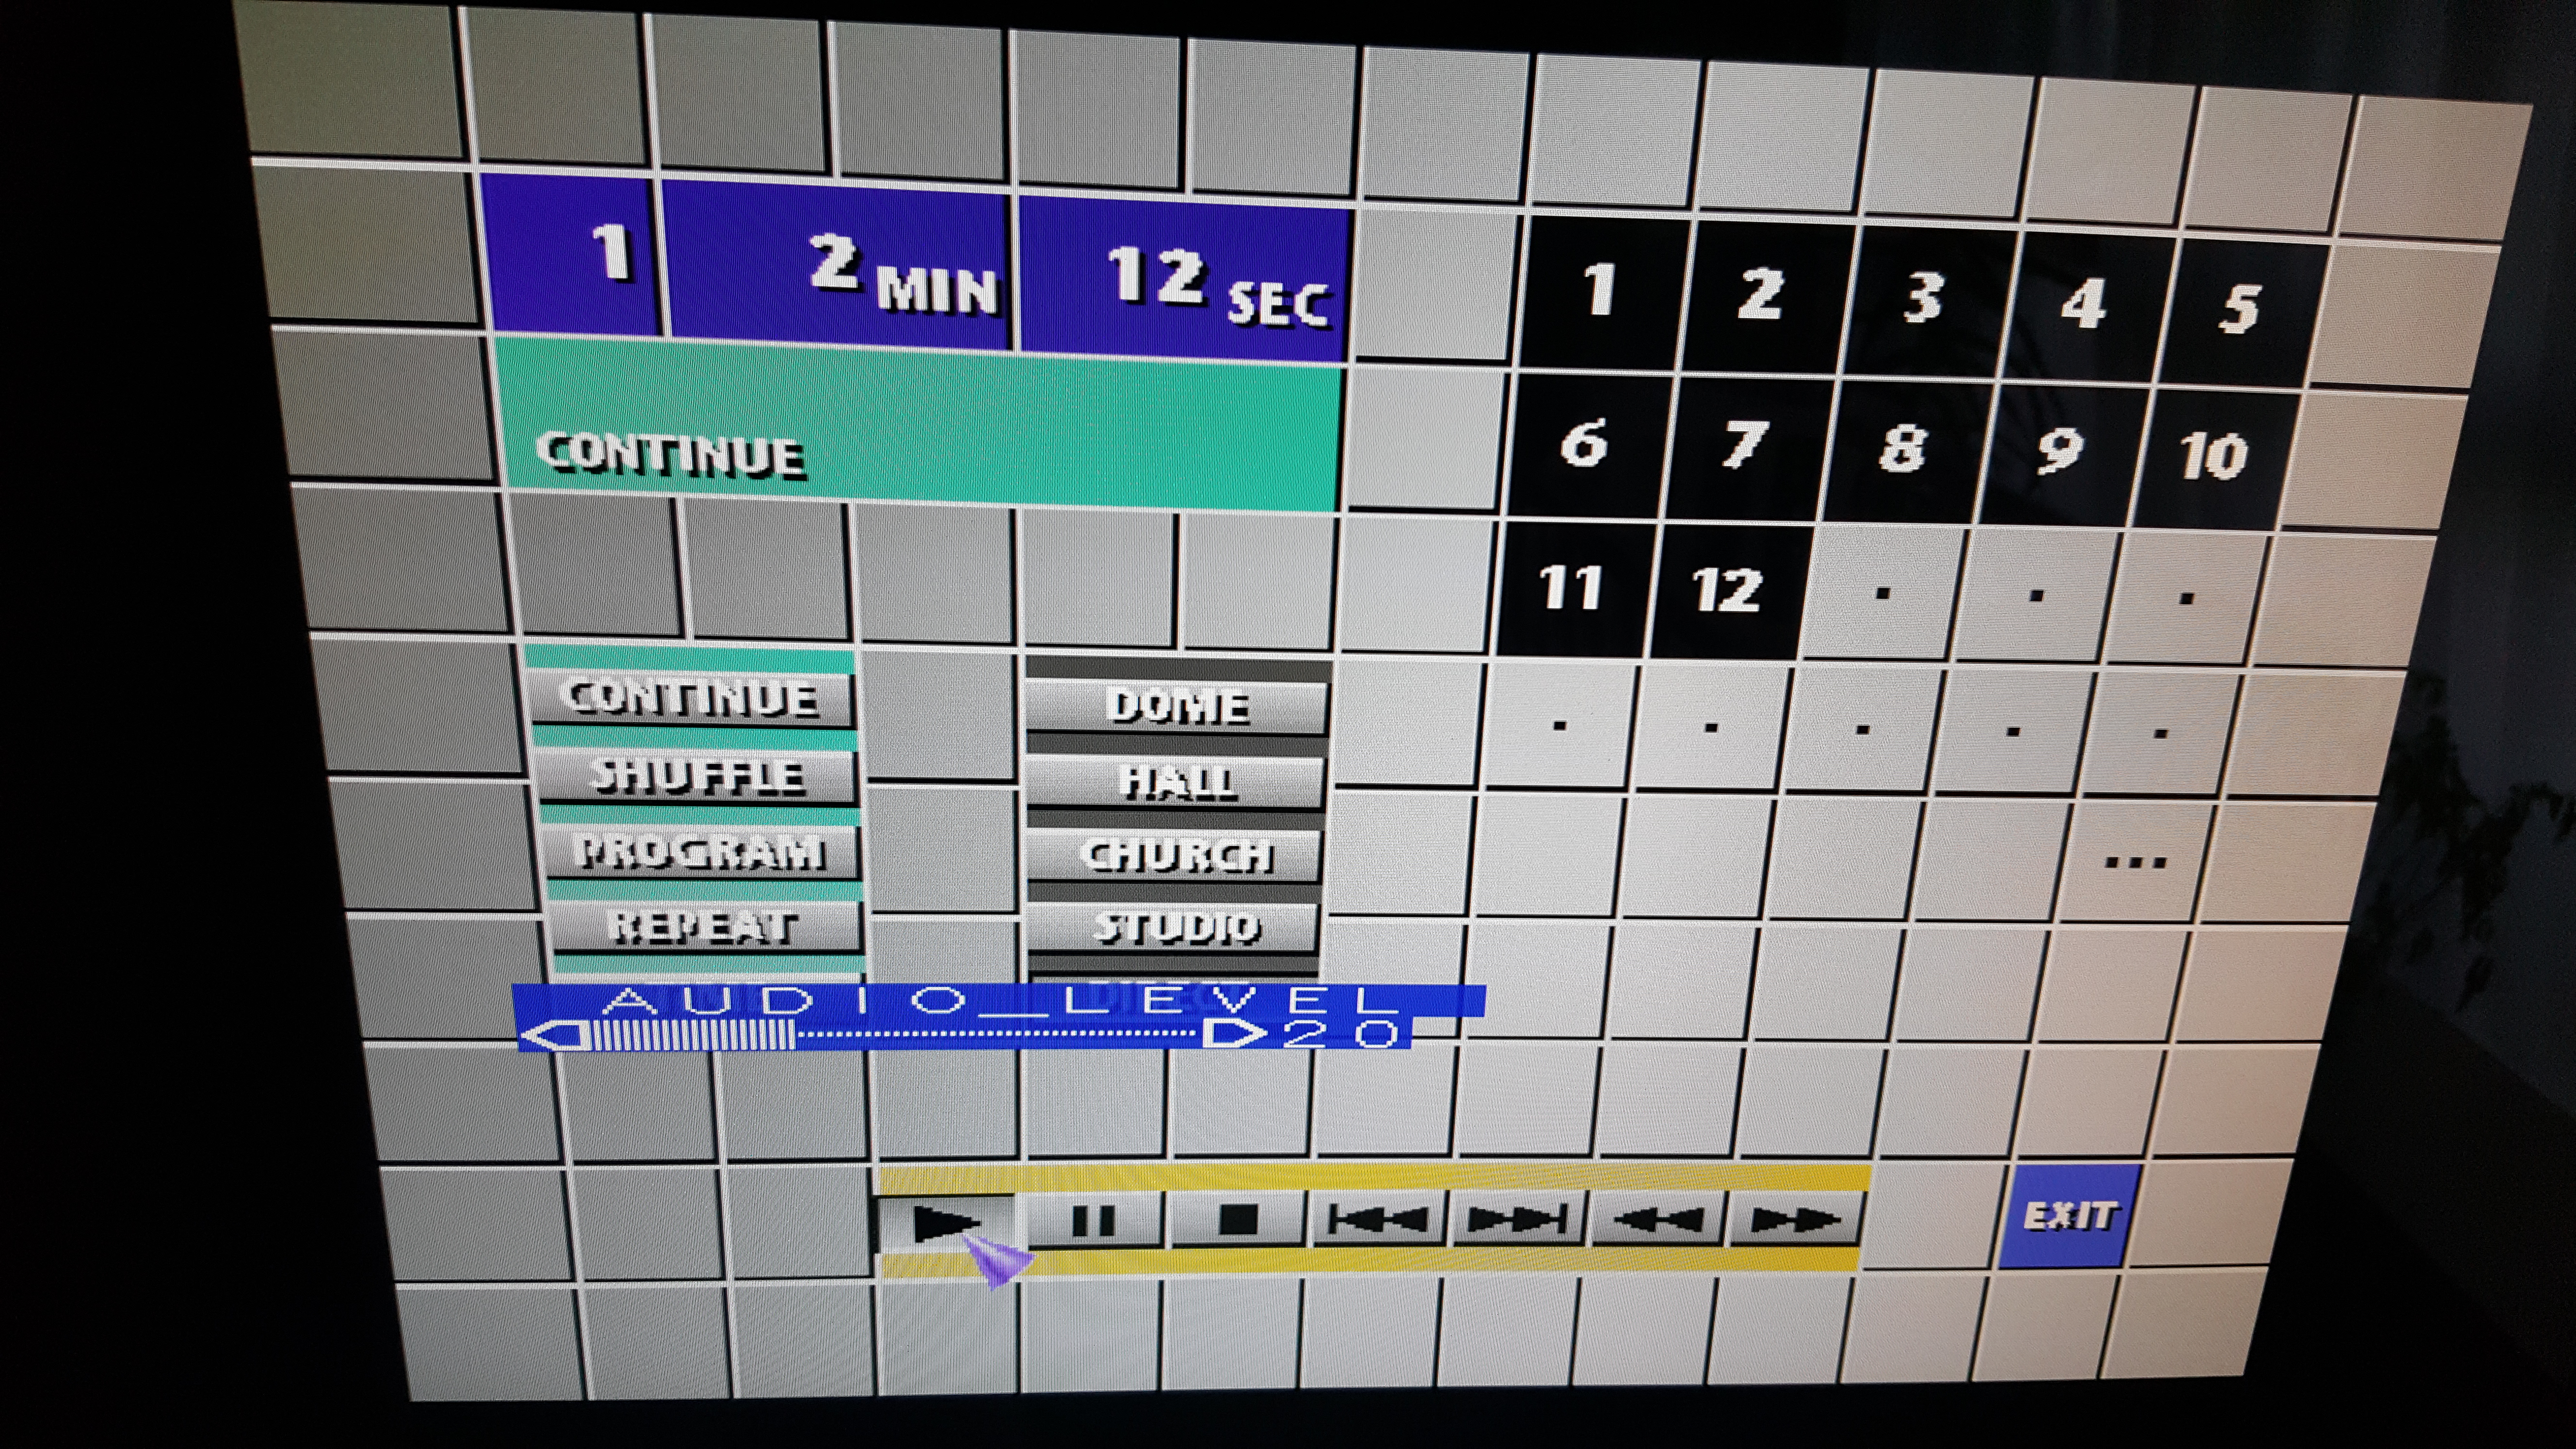
Status Screen
The Framemeister has two status screens: short and full. The short can be shown with the button on the remote or from menu STATUS->STATUS and lists input and output resolutions, audio format and sync lock information. The detailed or full status can be opened via STATUS->FULL_STATUS. There are several pages with the detailed information about inputs, resolutions, delays, etc.
Lag
There is a max. of 20ms of input lag. The delay is supposed to be shown on the full status screen. According to fudoh, depending on the input resolution, the output resolution and the processing mode, the delays vary from 1.03 ms to 9.83 ms or more. Now compare it to the lag from your TV without Framemeister!
Scanlines
Previously only using the the “Meister” mode, the scanlines can now be enabled for any mode. The Mini applies “classic” 240p scanlines to all the signals.
These are the dark lines, so characteristically for old CRT due to the image formation.
Previously only available in the mode «Meister», now available in every mode and resolution.
Resolution above 720 don’t look good. 480p or 720p are the best for scanlines.
You can adjust the scanlines in the menu.
Other issues
General issues
Slightly wrong RGB colours
Due a hardware design flaw, some colours, when output via RGB, will look a bit wrong. E.g. green can be very bright and will blend some grades together. This is not a case if you switch to YCbCr.
Maximum brightness level
The Framemeister has limited maximum brightness and the picture may look just a bit darker than the original. You can adjust the brightness in options, but this will cause that some shades will merge together.
Noise in some colours
There is another design flaw in the hardware, so that some shades may have a lot of noise. You can adjust the colours a bit and set another colour, which is not affected.
240p<>480i Resolution Changes
This is one of the biggest flaws of the Framemeister. As soon as your game changes its resolution (for example in many games on PS1 from 240p to 480i), the device will lose the sync and it will take time to recover it. This may take several seconds, so if you play an action game, this can be a game breaker.
Mega Drive
Some games switch resolutions during gameplay (see above!) and the Framemeister will lose synchronisation for about 10 seconds. After the image is restored, colours may flicker or the image may become monochrome. This applies to AV connection type.
Also, almost always there is a flickering coloured border on PAL systems (this is not Framemeister’s fault) and users have been asking for an option to mask it out. You can adjust the zoom option or you can use the profiles from this page. The profiles for Genesis/Mega Drive already take such borders into account.
Super Nintendo
Originally I used an AV cable, but the image was not that good. I ordered a SCART from Ebay (and the seller also wrote about “better condensators”). Despite of enhancements, the image had checkerboard pattern (see, e.g. the red on the letter K). Since the picture is from the actual screen, there are also other artefacts:
So I ordered another one, the so-called luma sync Scart cable and the image is clear. No checkerboard patterns anymore. You can by the cable here.
Video Comparisons
The first video is from NewGame Dendy without Mini directly through Elgato HD. My monitor doesn’t accept 240p output from Elgato, so I can only see the image in the Elgato application.
I will update this sections with newer videos, since those below show NES vie AV which doesn’t have good image quality.
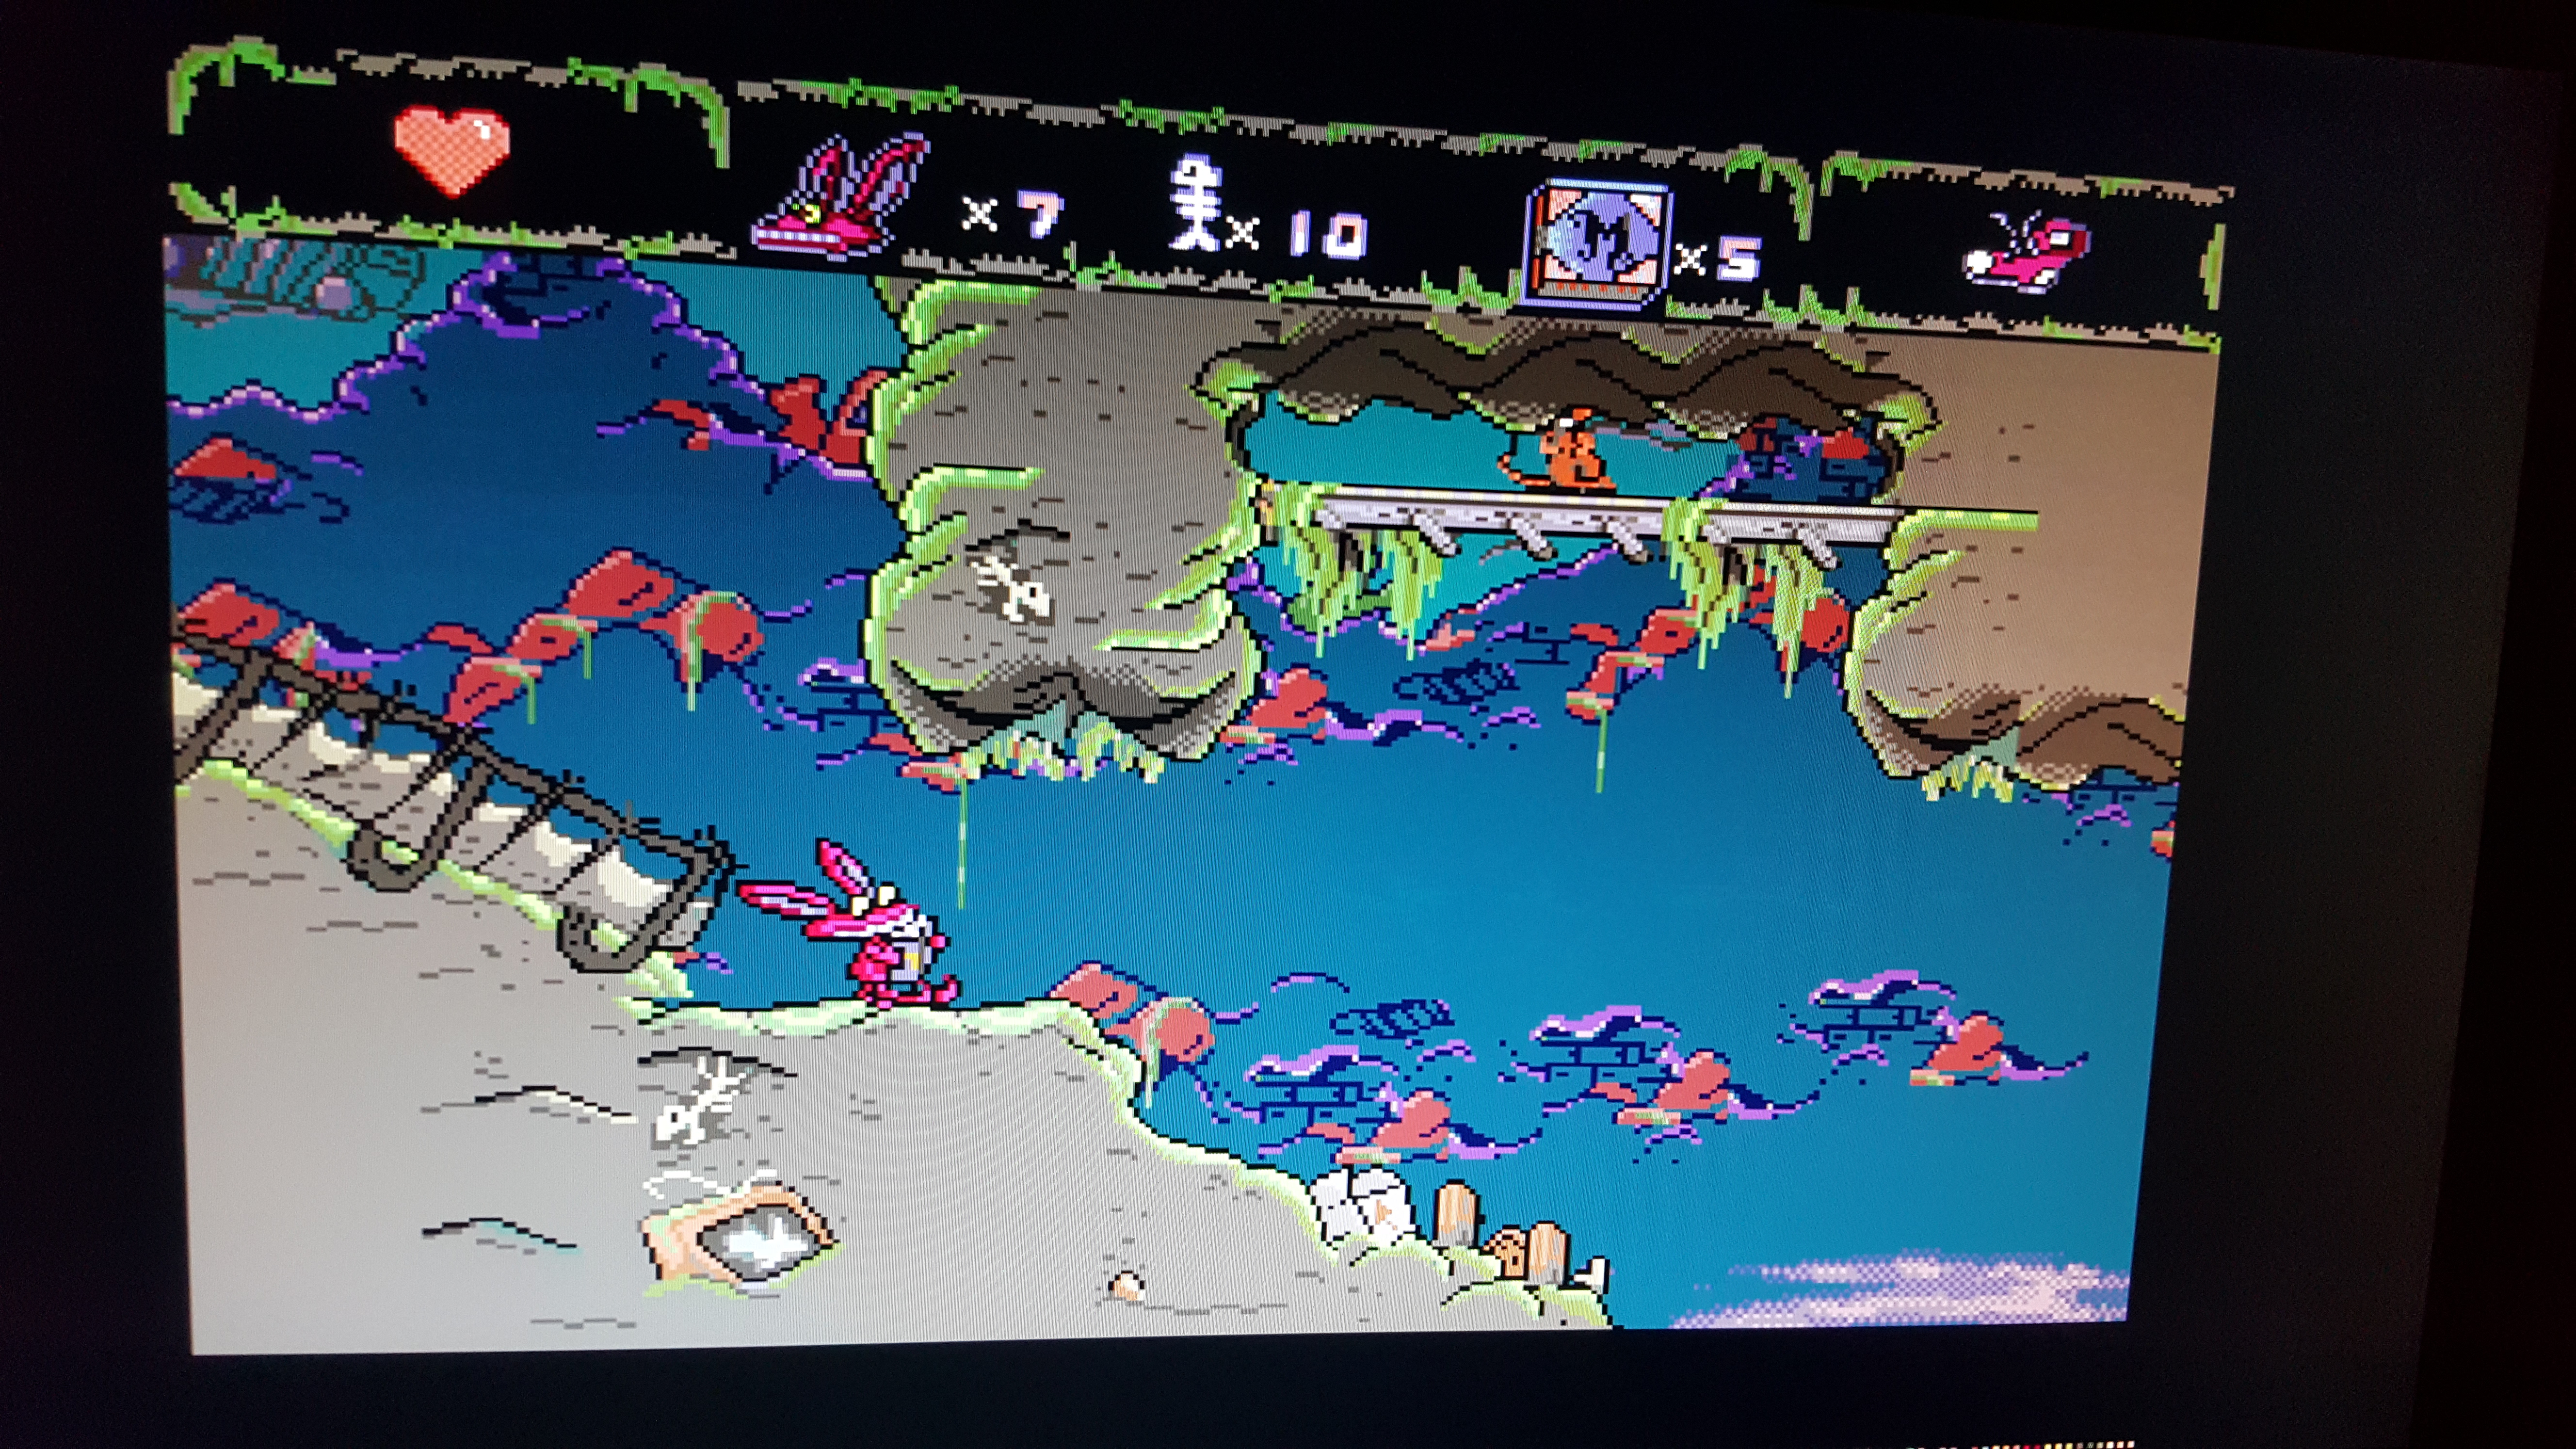
NES/Famicom/Dendy
This is how your NES will look on your TV without the Framemeister.

And then with:

And here’s in action:

Now, the video goes through the mini and the monitor accepts the signal. I click through different menus.
As you can see, the quality of AV (composite) is not that great, even with the Framemeister. The quality is much better, when I use the SCART (RGB). I was amazed by the Mega Drive picture – it never looked so good! This is an off-screen video, so forgive me the shaking. I was trying to capture the image as close as possible in order to show how separate pixels look like.
Another example:
SNES without Framemeister: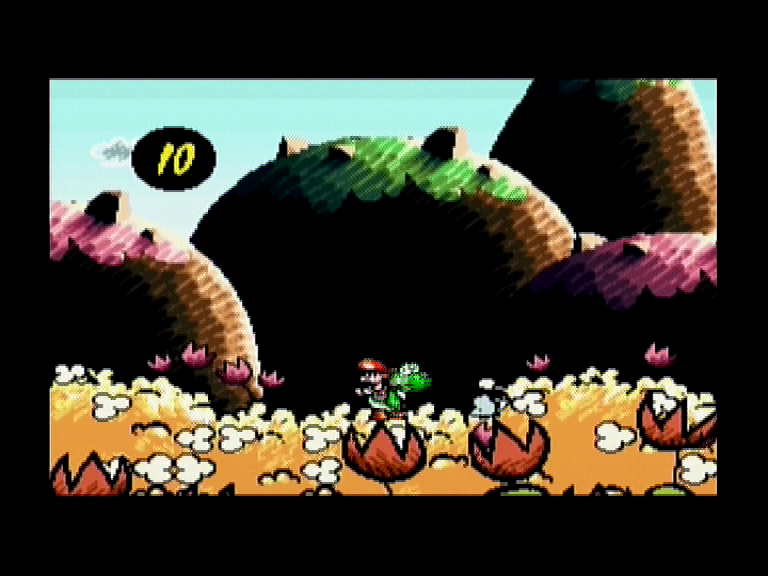
Here is a video I took with Elgato HD.
In the beginning of the video the image option “Natural” was used. It is not that prominent when used with Sega. Later I changed to “Picture” (15:39) and the image was better (sharper). You can compare Natural and Picture modes in this video. For Genesis “Picture” is the optimal mode.
Also, I checked scanlines.
Alternatives:
The real alternative is the OSSC 1.6, which offers almost lag-free (or lag-free experience). The unit costs 1/2 less and lacks some functions, but is, nevertheless the only really good alternative.
It’s seldom in stock and you can buy it only if you register yourself for an update mailing.
In a nutshell, what it can (among other functions, see this page for more information):
- Processes (line doubles) retro games with NO input lag and eliminates all deinterlacing artefacts; also it deinterlaces lag free
- Converts SCART and Component to DVI/HDMI
- Converts VGA to DVI/HDMI
- Converts analogue audio to digital DVI/HDMI
The last version output via HDMI and supports x2, x3 and even x4 upscaling. But this device has compatibility issues with SNES and its x3/x4 upscaling is not supported by all monitors.